You can add a deployed Kubernetes cluster to Commander’s inventory as a cloud account.
To add a Kubernetes cluster to Commander as a cloud account, a Kubernetes configuration file (known as a kubeconfig file) is required for the cluster. Commander will encrypt this file and store it in the Commander database to enable cluster access. See Configure Access to Multiple Clusters in the Kubernetes.io documentation for general information on how to generate a kubeconfig file for the cluster.
When you add a Kubernetes cluster, changes made through Commander will be displayed as soon as the tasks for those changes have finished. Commander will also regularly check for updates from the cloud infrastructure where the cluster resides.
You can also use predefined Commander workflows to deploy a Kubernetes cluster, and then use Commander’s orchestration, self-service, and expense management features to manage the cluster.
Add Kubernetes clusters
Access: | Views > Inventory |
Available to: | Commander Roles of Superuser and Enterprise Admin |
To add a Kubernetes cluster as a cloud account in Commander:
- Click the Infrastructure, Applications, or Storage tab.
- Select the root node of the Infrastructure, Applications, or Storage tree.
- Select Actions > Add Cloud Account.
- In the Add Cloud Account dialog, select Kubernetes from Cloud Account Type.
- Complete the fields as required:
- Name: Enter a name for the cloud account. Note that Service Portal users may see this name if they have permission.
- Configuration File: Click Browse and navigate to the kubeconfig file for the Kubernetes cluster.
- For Update Frequency, enter a value from 1 to 180 to set the initial frequency (in minutes) to use to check for updates from the cloud infrastructure where the cluster resides. The frequency at which Commander will check for updates will exponentially increase (to a maximum of 180 minutes) if no updates are detected.
More frequent updates (a short update frequency setting) may impact performance, especially in large installations.
- Click OK.
After the cluster is added to Commander, add the underlying private or public cloud as a cloud account to enable full orchestration and automation for the cluster.
Add GKE clusters
To add a Google Kubernetes Engine (GKE) cluster to Commander as a cloud account, you must configure the authorization and authentication settings for the cluster, then generate a kubeconfig file for the cluster. These configuration steps are required to enable Commander to connect to the GKE cluster.
Once a kubeconfig file is generated, add the cluster to Commander.
Configure the GKE cluster
You can configure the authentication and authorization settings for a GKE cluster.
The following steps show how to configure the cluster through the Google Cloud Platform Console and Cloud Shell console. If you want, you can also use a local shell.
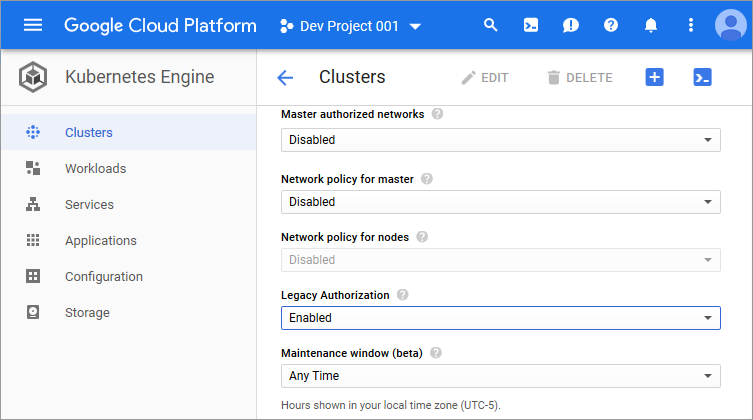
- In the Google Cloud Platform Console, go to the Kubernetes Engine page.
- In the left menu, click Clusters, and on the Kubernetes clusters page, select the cluster you want to add to Commander.
- On the configuration page for the cluster, click Edit, and from Legacy Authorization, select Enabled.

- Scroll down to the bottom of the page and click Save.
You can also use the
-enable-legacy-authorizationgcloud command to enable Legacy Authentication for a GKE cluster. For more information, see gcloud container clusters create in the GCP documentation. -
From the top-right corner of the console, click the
 Activate Google Cloud Shell button.
 - In the Cloud Shell session that opens at the bottom of the console, enter the following command to configure the cluster to authenticate with the client certificate:
gcloud config set container/use_client_certificate true
- Enter the following command to generate a kubeconfig file for the cluster:
gcloud container clusters get-credentials <CLUSTER_NAME>
where
<CLUSTER_NAME>is the name of the cluster. - Change to the
.kubedirectory, where the kubeconfig file is written to:cd .kube

- Click the More button, and select Download file.
- In the Download file dialog, enter the fully qualified path to the kubeconfig file, then click Download.
For example:
/home/<username>/.kube/configThe kubeconfig file is downloaded to the your local computer. This kubeconfig file is required to add the Kubernetes cluster as a cloud account to Commander.

Add the GKE cluster in Commander
Access: | Views > Inventory |
Available to: | Commander Roles of Superuser and Enterprise Admin |
To add a GKE cluster to Commander as a cloud account:
- Click the Infrastructure, Applications, or Storage tab.
- Select the root node of the Inventory tree.
- Select Actions > Add Cloud Account.
- In the Add Cloud Account dialog, choose Kubernetes from Cloud Account Type.
- Complete the fields as required:
- Name: Enter a name for the cloud account. Note that Service Portal users may see this name if they have permission.
- Configuration File: Click Browse to navigate to the kubeconfig file for the cluster. This kubeconfig file will be encrypted and stored in the Commander database to enable cluster access.
- Click OK.
If you make changes to the cluster, use the Edit Cloud Account command to replace the kubeconfig file. You can also change the cloud account's name.
To access the clusters in Commander, assign access rights to admin users. For more information, see Assign access rights to administrative users.
Snow Software does not own the third party trademarks, software, products, or tools (collectively, the “Third Party Products”) referenced herein. Third Party Product updates, including user interface updates, may not be reflected in this content.
