Here are the various ways you can customize display in the Admin Portal.
Add, remove, or rearrange table columns
Some tables in Commander are interactive and allow you to select the information that is displayed by adding, removing, or rearranging the properties. For a list of all supported properties, see Properties Reference.
- Right-click anywhere in the table, and select Pick Columns.

- In the Column Selection dialog, do any of the following:
- To add a column, select a column from the Hidden Columns section and click Add >.
- To remove a column, select a column from the Shown Columns section and click < Remove.
- To change the column order, select a column from the Shown Columns section and click Move Up or Move Down.
The order of the columns in the Shown Columns section is also the order in which they'll be displayed in the table.
- Click OK when you're done.
To restore the default view, right-click the table and choose Reset Columns.
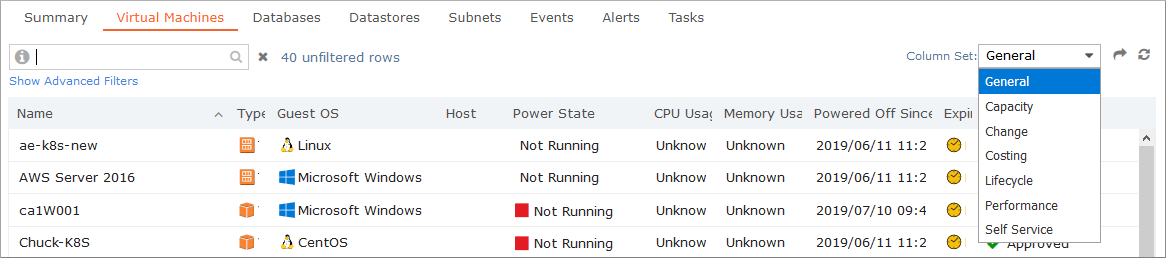
Choose categories of VM columns to display
Commander includes several predefined sets of columns for VMs. You can choose specific column sets to view different types of data for the VMs.
Access: | Views > Inventory |
Available to: | All Roles |
- Click the Infrastructure or Applications tab.
- Select the Virtual Machines tab.
- From Column Set at the right of the page, select a predefined column set type.
The example below shows the available column sets.

Display properties
On the Summary pages for resources such as VMs, virtual services, resource pools, hosts, clusters, datacenters, folders, and cloud accounts, a number of properties and attributes can be displayed. You can customize which properties you want to display and the order in which they are displayed.
For a list of all supported properties, see Properties Reference.
Access: | Views > Inventory |
Available to: | All Roles |
To set which resource properties and attributes to display:
- Click the Infrastructure, Applications, or Storage tab.
- On the Summary page, beside Details, click .
- In the Property Selection dialog, use the middle buttons to add and remove displayed properties or to change the position of the properties, then click OK.
Customize available VM actions
When you select a resource from the Infrastructure, Applications, or Storage view, the actions that you can perform on that resource are accessed through the Actions drop-down list. The Actions drop-down list is available on any of the Infrastructure, Applications, or Storage view pages.
For VMs, many actions may be available. However, if there are some actions that you frequently use or that are particularly important, you can add them as "quick actions" to the top of the Actions drop-down list. For example, if you add "Request Service Change" as a quick action, you won't have go to Actions > Configuration Management > Request Service Change whenever you request a service change for a VM.
If your Commander administrative role doesn't allow you to perform certain actions in Commander, those actions won't appear as quick actions. For example, if you have an Auditor role, you can choose to display all actions, but only those commands permitted for an Auditor role will be available.
In the following example, the first five actions are the chosen "quick actions".

Access: | Views > Inventory |
Available to: | All Roles |
To customize the VM actions that are displayed as quick actions:
- Click the Infrastructure or Applications tab.
- From the Infrastructure or Applications tree, select a VM or virtual service.
- Click the icon beside Actions.
- In the Action Selection dialog, use the middle buttons to add and remove actions or to change the position of the actions, then click OK when you're done.
Change the default number of items in lists
By default, the number of items displayed in a list is 20. However, you can change the default number of items that can appear in a list. For example, if you have a large cloud infrastructure with many resources, such as VMs, that are displayed in lists in Commander, you may want to use a large number.
Most lists provide Quick Search, making it easy to quickly filter a long list. You can also override the global preference for default list size for some individual lists, but the override applies only to your current session.
Access: | Configuration > Preferences |
Available to: | All Roles |
- In the List Preferences section, select the default number of items to appear in a list from Default list size.
- Click Save Settings.
Select your default landing page
You can set the landing page that Commander opens to when you sign in.
Access: | Configuration > Preferences |
Available to: | All Roles |
- In the Landing Page section, select the landing page that you want from the menu.
- Click Save Settings.
Select your display currency
You can choose the currency for displaying your costs. This selection will override the default currency setting. To change the default currency for all users, see Set the default currency.
Currency conversion may result in small cost discrepancies due to rounding during conversion.
Access: | Configuration > Preferences |
Available to: | All Roles |
- In the Currency section, select the currency.
- Click Save Settings.
Disable auto-refresh for large environments
If you have a large cloud infrastructure with a lot of activity taking place, you shouldn't use the auto-refresh feature. When enabled, this option allows Commander to automatically update the lists of VMs and datastores in the Infrastructure, Applications, and Storage views while you're working on them. However, if you have a large infrastructure, auto-refresh can affect Commander performance.
When auto-refresh is disabled, Commander won't automatically refresh lists while you're working on them. This means, for example, you'll have time to select multiple items on a list and to carry out commands on that list. However, if auto-refresh is enabled, the items you selected may be cleared before you can carry out any commands. Therefore, by default, auto-refesh isn't enabled.
Access: | Configuration > Preferences |
Available to: | All Roles |
- In the List Preferences section, enable the Disable auto-refresh check box.
- Click Save Settings.
