Once you've set quotas for an organization, you can create an approval workflow that allows you to automatically approve or reject requests based on an organization's available quota. Approval workflows are triggered when service requests are made by users. You can create a separate approval workflow for each organization or a single global approval workflow. You can also specify that the organization manager receives approval emails.
Here are a few examples of what you can set up:
- If a service request is within quota, send an approval email to the organization manager, but if a request will exceed quota, send an approval email to a higher-level manager.
- If a service request is within quota, have it automatically approved, but if it will exceed quota, reject the request.
- If a service request will exceed a user's quota, send an approval email, but if it will exceed an organization's quota, send an approval email to a higher-level manager.
Quotas for service requests are shown in the currency that was selected when the organization was configured.
Resource quota-based service request approval workflows don't work for CloudFormation services.
If you set up a global quota-based approval workflow, quota workflow steps are skipped for users that aren't part of an organization.
For more information, see Approval Workflows.
Simple quota-based request approval workflow example
Access: | Configuration > Self-Service |
Available to: | Commander Role of Superuser and Enterprise Admin |
The following example shows how to set up a simple approval workflow for a new service request. If a service request is within the organization's quota, an approval email will be sent to the organization manager, but if the request will exceed the organization's quota, the request will be rejected.
Before setting up the workflow:
- Click the Approval tab.
- On the Approval page, click Add.
The Approval and Pre-Provisioning Workflow Configuration dialog displays.
- On the Name & Type page, enter a name for the workflow, from the Apply this workflow menu, choose the When a new request is created (the default setting), then click Next.
- On the Assignment page, assign the workflow to an organization, then click Next.
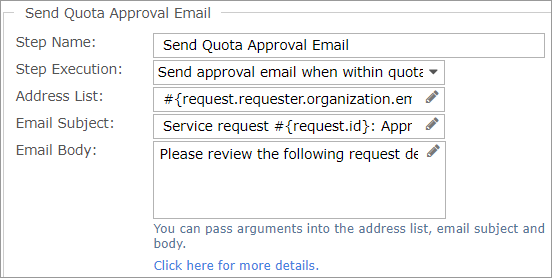
- On the Steps page, click Add > Send Quota Approval Email.
- In the Details pane, do the following:
- From the Step Execution menu, choose Send approval email when within quota.
- In the Address List field, enter the following to send the email to the primary contact(s) of the organization:
#{request.requester.organization.email} - Keep the default text for the email subject and email body. Quota information will automatically be included in the approval email.
- Click Add > Send Quota Approval Email again.
- This time, in the Details pane, from the Step Execution menu, choose Reject request when organization quota is exceeded , then click Next.
- On the Automation Options page, specify whether approved requests will be automatically deployed or fulfilled, then click Next.
For more information on the options, see Create Approval Workflows for Service Requests.
- Review the Summary page, then click Finish.
