Single sign-on (SSO) allows Commander and Service Portal users to authenticate once before accessing multiple service provider resources, including Commander and the Service Portal.
How it works
Commander uses the SAML 2.0 Web Browser SSO profile to provide single sign-on. Security Assertion Markup Language (SAML) is an XML-based, open-standard data format for exchanging authentication and authorization data between an identity provider (IdP) and a service provider.
The IdP is the service you provide that authenticates your users and can provide user identity information to Commander and the Service Portal.
As part of configuring SSO, you must establish trust between your IdP and Commander. This involves generating metadata for your IdP and providing it to Commander, and generating metadata for Commander and providing it to your IdP.
You can sign in to both Commander and the Service Portal using SAML SSO. If SAML is misconfigured or malfunctioning, you can bypass SAML and sign in to Commander using Commander credentials. For more information, see Bypass SAML. No bypass is available for the Service Portal.
The SAML settings for Commander won’t be shared with the SAML settings for the Service Portal. You can set up Commander and the Service Portal separately and you can set up just Commander or just the Service Portal.
- Commander respects the session timeout configured for Commander and the Service Portal, rather than the IdP's session timeout.
- You must configure the IdP's session timeout to work with Commander's session timeout. The IdP's session timeout should be significantly longer than the session timeout for Commander.
- When using SAML SSO, the sign in speed is based on factors outside of Commander, such as the response time from your IdP and the speed of your infrastructure.
- This capability also provides for multi-factor authentication (MFA), since many SAML SSO providers directly support MFA.
Prerequisites
- A directory service (Active Directory or LDAP) must be integrated with Commander prior to configuring SAML SSO integration. Before proceeding with SAML integration, the Commander internal user database needs to be built by adding users or groups to Commander from the Active Directory or LDAP integration. These users must have a valid email address as that's the account property that will be exchanged between the Directory Service, IdP and Commander to authenticate users.
- Commander must be installed with a valid signed certificate. For more information, see the Snow Globe article Generating and Installing an SSL Certificate.
- The Commander Tomcat service requires a PKCS #12 keystore to sign SSO requests. A keystore contains a public/private key pair plus a certificate. As part of configuring SAML SSO in Commander, you must upload a PKCS #12 keystore and provide the following information:
- the keystore password
- the alias of the key pair in the uploaded keystore file
- the key pair password
- You must have an operational IdP and generate metadata for that IdP. This task is performed outside Commander. For more information, consult your IdP documentation.
- If you have deployed Commander or the Service Portal behind a load balancer, you must enable session pinning on your load balancer. Session pinning enables the load balancer to bind a user's session to a specific instance, ensuring that all of the user's requests during the session are sent to the same instance. For more information, see the Commander High Availability Configuration Guide on Snow Globe.
Prepare a keystore for SAML SSO
For both Commander and the Service Portal, the metadata that must be generated for your IdP requires your current keystore configuration. Any changes you make to the keystore configuration will require you to upload the new Commander SAML metadata file to your IdP server or otherwise make sure your IdP is accessing the correct URL for metadata.
The task of generating metadata for your IdP is performed outside Commander. For more information, consult your IdP documentation.
In the procedure below, the example command assumes the following about your original source keystore, which should be true when using the Commander defaults:
- The keystore contains a key pair named
tomcat. - The keystore is protected with the password
changeit. - The key pair isn't password protected.
If you chose to use a different key pair or password for the source keystore, you must replace the -srcalias and -srcstorepass values in the procedure below. If you don't have the correct values, Technical Support won't be able to retrieve them for you.
As of vCommander 6.0, the SAML SSO configuration requires administrators to create a second keystore for the Tomcat webserver using a PKCS#12 file. This second keystore enhances the end-to-end security and protects user sessions.
In the example command, a second destination keystore is generated to validate for your IdP. It assumes the following about your "destination" keystore:
- The keystore file name will be
saml-keystore.p12. - The keystore contains a key pair named
saml. - The keystore is protected with the password
changeit.
If you chose to use a different key pair or password for the destination keystore, you must replace the -destalias and -deststorepass values in the procedure below. If you don't have the correct values, Technical Support won't be able to retrieve them for you.
To prepare a keystore:
- On the Commander application server, open a command prompt and browse to
<INSTALL_DIRECTORY>\Embotics\vCommander\jre\bin\. - Issue the following command:
keytool -importkeystore -srckeystore ..\..\tomcat\conf\keystore -srcstoretype JKS -srcalias tomcat -srcstorepass changeit -destkeystore ..\..\tomcat\conf\saml-keystore.p12 -deststoretype PKCS12 -deststorepass changeit -destalias saml
This command extracts a key pair named "tomcat" from the original keystore and places it into a file. Any used passwords will remain the same.
- Retrieve the file
<INSTALL_DIRECTORY>\Embotics\vCommander\tomcat\conf\saml-keystore.p12, and store it in a secure location.
Configure SAML SSO for Commander and Service Portal
The following procedure applies to configuring both Commander and the Service Portal SSO, with appropriate filepaths for each. The bypass instructions only apply to Commander.
Access: | Configuration > Identity and Access |
Available to: | Commander Role of Superuser |
- Click the Authentication tab.
- In the SAML Single Sign-On section for either Commander or the Service Portal, click Edit.
- In the SAML Single Sign-On dialog for either Commander or the Service Portal, select Enabled to enable SSO.
- If you want users to be signed out of the IdP and all other service providers when they sign out, enable Global Sign Out.
- Provide the IdP metadata (see the Prerequisites above). In the Identity Provider area, do one of the following:
- If your metadata is accessible online, select URL, then enter an accessible URL that isn't protected by a user name and password.
- If you have a downloaded metadata file, click Add and browse to the file.
To store the metadata: Using the following exact file name, copy your metadata directly to the following location on the Commander server:
<Commander install dir>/tomcat/conf/sso-idp-metadata.xml
- In the SAML Key Pair section, provide a PKCS #12 keystore that Commander will use to sign SSO requests (see the Prerequisites above).

- Click Add and browse to a PKCS #12 file.
- Enter the keystore password (default value:
changeit). - Enter the alias for the key pair in the selected keystore file (default value:
saml). - Enter the password for the key pair (default value:
changeit). - In the Service Provider Metadata section, provide information that Commander will use to create metadata that you will then upload to your IdP.
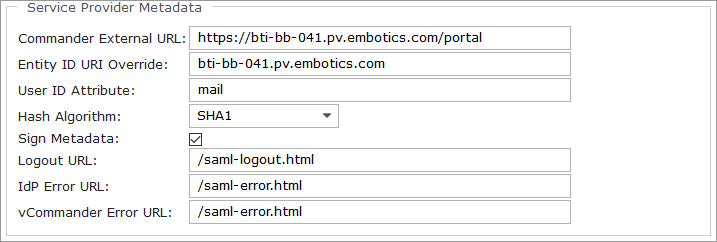
- External URL — The Commander External URL or the Service Portal External URL field displays the Commander or the Service Portal URL by default. If Commander or the Service Portal is deployed behind a load balancer or proxy, enter the load balancer or proxy URL. Otherwise, leave the default URL.
- Entity ID URI Override — In the Entity ID URI Override field, enter the override value for the entity ID that's in the SAML metadata generated by Commander or the Service Portal.
- User ID Attribute — In the User ID Attribute field, enter the attribute in the SSO payload that will allow Commander to identify a Service Portal user account. The default attribute is
mail. - Hash Algorithm — From the Hash Algorithm list, select the secure hash algorithm required by your IdP. The default is SHA1; SHA256, SHA384 and SHA512 are also supported.
- Sign Metadata — By default, Commander metadata is signed. If you don't want the metadata to be signed, clear the Sign Metadata option.
Using unsigned metadata in production environments isn't recommended.
- Sign Out URL — In the Sign Out URL field, enter the URL for the page where you want the Commander or Service Portal user to land after signing out. The default URL for Commander is
/saml-logout.htmland the default URL for the Service Portal is/saml-logout.xhtml. - IdP Error URL — In the IdP Error URL field, enter the URL for the page where you want Commander or Service Portal users to land if an error occurs while signing in to the IdP. The default IdP Error URL for Commander is
/saml-error.htmland the default URL for the Service Portal is/saml-error.xhtml. - Commander Error URL — In the Commander Error URL field, enter the URL for the page where you want Commander or Service Portal users to land if an error occurs while signing in to Commander or the Service Portal. The default URL for Commander is
/saml-error.htmland the default URL for the Service Portal is/saml-error.xhtml.
- Click OK.
- If you need to upload a metadata file to your IdP, in the SAML Single Sign-On section of the Authentication tab for either Commander or the Service Portal, click Download.
If you need to provide a URL for accessing the metadata, use the following:
For Service Portal:
https://<Commander host>:<port>/service_portal_metadata.xmlFor Commander:
https://<Commander host>:<port>/admin_portal_metadata.xml - Configure your IdP to trust Commander. See below for an example using Active Directory Certificate Services (ADFS). For more information, consult your IdP documentation.
- To test your configuration, sign out of Commander or the Service Portal and then sign back in.
You will be redirected to a sign in page on the IdP server.
- Sign in as an existing Commander or Service Portal user.
If you can't sign in, you can bypass SAML by using Commander credentials. For more information, seeBypass SAML. No bypass is available for the Service Portal.
You are able to access Commander or the Service Portal without having to sign in again.
Troubleshooting SSO configuration
While testing Commander or Service Portal access with SSO, if you receive a 403 error, make sure the metadata has been uploaded properly to your IdP server. If you have confirmed that the metadata has been uploaded correctly, review the vCommander.log file for errors, or open a ticket with Customer Support, being sure to include a diagnostics package. For more information, see Submitting Snow Commander Diagnostics in the Snow Globe user community.
If you make configuration changes, you must upload the new Commander SAML metadata file to your IdP server or make sure your IdP is accessing the correct URL for metadata.
Bypass SAML
In case of SAML misconfiguration or malfunction, you can bypass SAML in Commander but not in the Service Portal.
When SAML is enabled, an audit event is generated of each sign in (successful or unsuccessful) to Commander using the SAML bypass mechanism. See Monitor with Tasks, Alerts, Events.
To sign in to Commander using Commander credentials instead of SAML, enter the following bypass URL:
https://<Commander host>:<port>?defaultLogin.
Example: Configuring IdP for SSO using ADFS
The following example shows how to configure an IdP for SAML 2.0 SSO, using Active Directory Federation Services (ADFS) as an example. This example is for SAML SSO with the Service Portal and not SAML SSO for Commander. You can also configure SAML SSO for Commander.
Prerequisites for this example
- Commander must be installed with a valid certificate. This example uses an internal certificate authority (CA).
- You must have a verified operational ADFS server. For more information, see Verify That a Federation Server Is Operational from the Microsoft documentation.
- You need a Service Portal user account to test the configuration. This user must be a member of the domain for which the ADFS server has been configured.
- You must configure Commander for SSO and generate Commander metadata as shown in the procedure above.
Configure ADFS servers for SSO
- On the ADFS Server, launch the ADFS Management Console.
- Right-click the tree and select Add Relying Party Trust.
- On the Select Data Source page of the Add Relying Party Trust Wizard, select Import data about the relying party from a file.
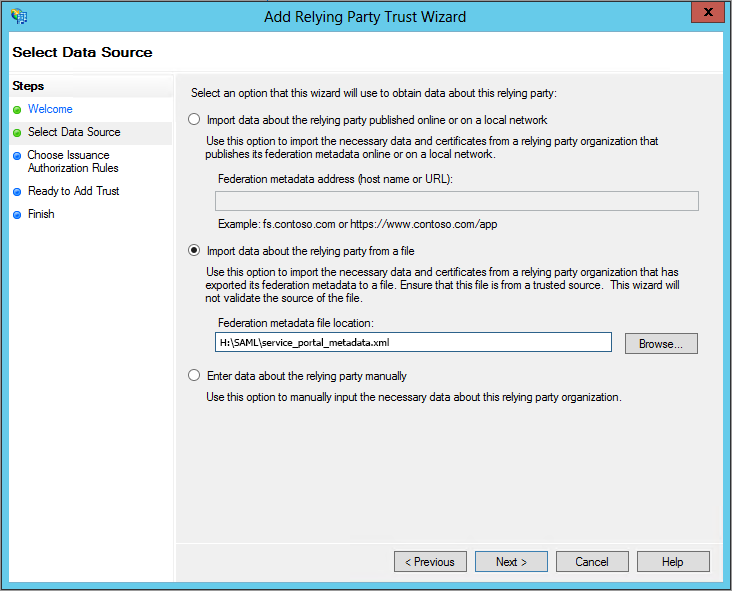
- Click Browse and navigate to the
service_portal_metadata.xmlfile you generated in the previous procedure, then click Next. - On the Specify Display Name page, give the trust configuration an identifying name, such as "Commander Service Portal SSO", then click Next.
- On the Choose Issuance Authorization Rules page, select Permit all users to access this relying party, then click Next.
In a production environment, we don't recommend allowing access to all users.
- On the Ready to Add Trust page, review your settings, then click Next.
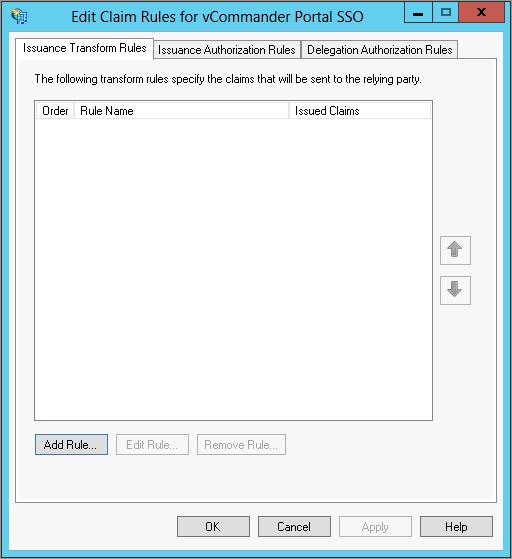
- On the Finish page, select Open the Edit Claims Rules Dialog for this relying party trust when the wizard closes, then click Close.
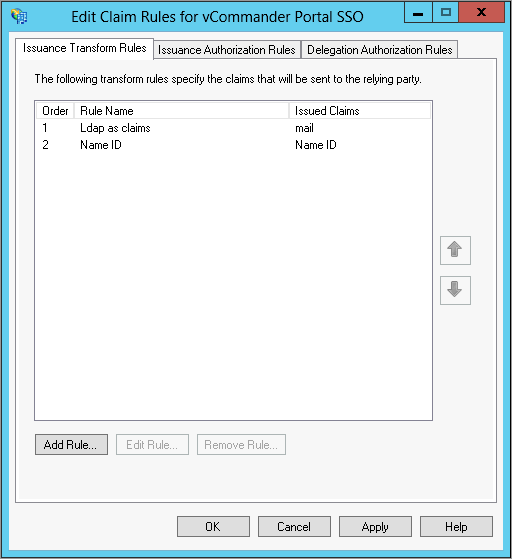
- In the Edit Claim Rules window, go to the Issuance Transform Rules tab and click Add Rule.
- On the Select Rule Template page of the Add Transform Claim Rule wizard, from the Claim Rule Template list, select Send LDAP Attributes as Claims, then click Next.
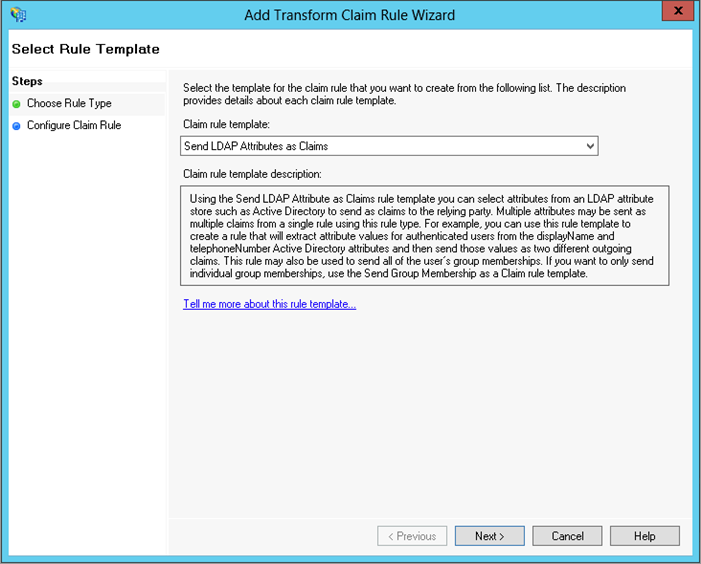
- On the Configure Rule page, configure the rule to map User-Principal-Name to mail.
The mapped attribute must match the Credential Attribute configured above.
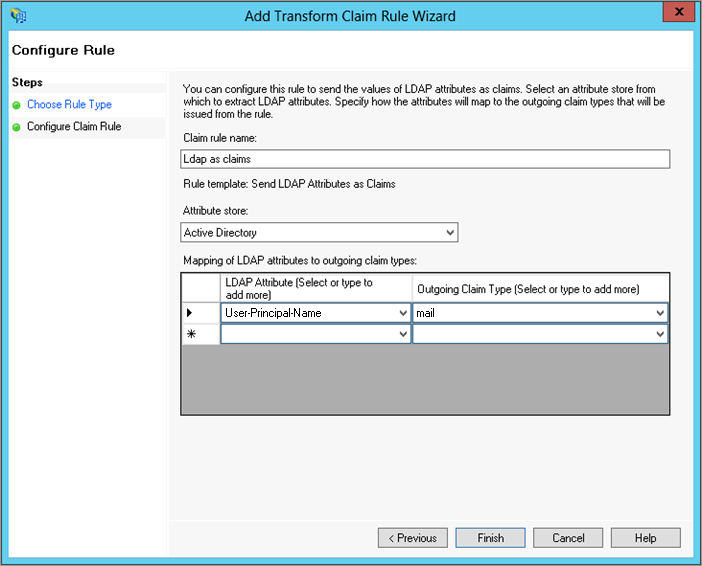
- Click Finish.
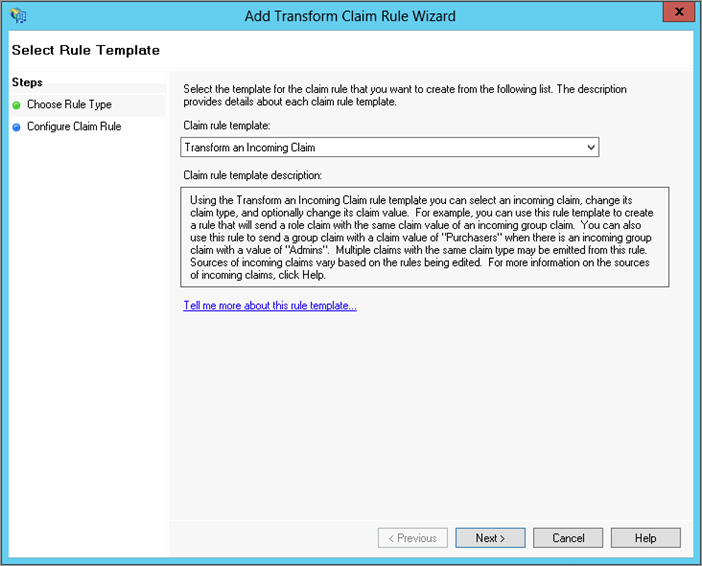
- On the Select Rule Template page of the Add Transform Claim Rule Wizard, add another rule to transform an incoming claim and give the rule a name, then click Next.
- On the Configure Rule page, configure the rule to map the Windows account name to the Windows-formatted Name ID, then click Finish.
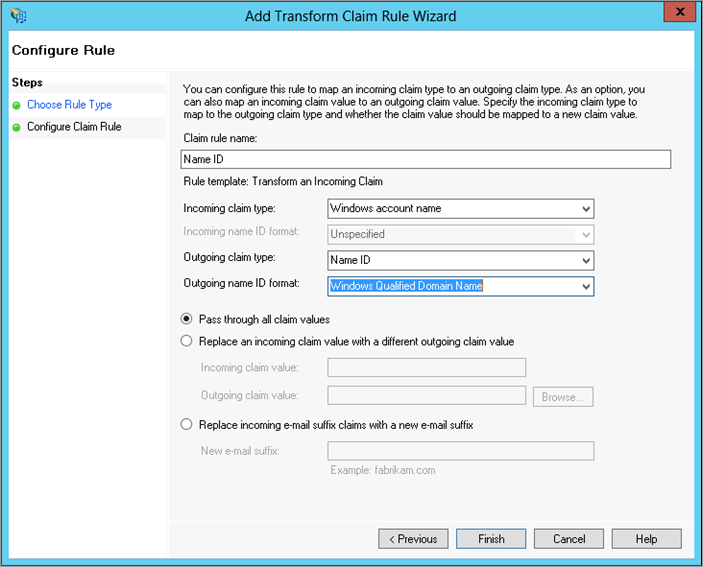
- Verify your settings and click OK.
Test the configuration
- Go to
https://<Commander host>:<port>/portal.You are redirected to a sign-in page on the ADFS server.
- In the same browser session, sign in as a preconfigured Service Portal user.
You are able to access the Service Portal without having to sign in again.
