To install Commander on two application servers hosted on AWS that are configured as an active-passive cluster, perform the following steps:
- Install Commander on Node 1, against the database you intend to use for production.
Ensure Commander has been activated with a license first, before proceeding further.
- Create a read-only SQL user on the Commander production database. You can't use a domain account.
- Log in to Commander on Node1 and create a local user account with the Superuser role. This is the account that the passive node will use to perform login checks.
- Install Commander on Node 2, against the dummy database you will not use in production. The path to the installation directory, service account, and installation package must be identical to that used for the installation on Node 1.
- Verify that you can log in to both installations without issue.
- On both nodes, stop the Commander Windows service.
- On Node 1, open the Commander
HA.propertiesfile.The location of the
HA.propertiesfile depends on the directory that you chose to install Commander to. The default install location is\Program Files\Embotics\Commander\tomcat\common\classes\. Other files referenced in this topic will also assume this default location. - Set the following to configure Node 1 for HA:
embotics.cluster.enabled=true
- Set your read-only SQL credentials:
hibernate.connection.username=your SQL user accounthibernate.connection.password=your SQL user password
- Set the active database SQL user credentials:
embotics.cluster.dbuser=your SQL user accountembotics.cluster.dbpasswd=your SQL user password
- Set the account to be used for login health checks. This is the HA user account that you created earlier. See Create an HA User:
embotics.cluster.rest.user=your Commander user accountembotics.cluster.rest.password=your Commander user password
- Set the IP address or hostname of the other node in the cluster, including the port number if other than 443:
embotics.cluster.rest.url=xxx.xxx.xxx.xxx:xxxx
- Set the unique AWS instance ID of the current node, used for logging:
embotics.cluster.service.id=x-xxxxxxxxxxxxxxxxx
- On Node 2, modify the same
HA.propertiesfile.All the values will be the same as those set for Node 1 except for the address of the other node in the cluster (
embotics.cluster.rest.url) and the unique ID for the current node(embotics.cluster.service.id). - Start the Commander service on Node 1, and wait until the Commander login page appears before proceeding further.
- Make the REST API POST call shown below in Postman to set Node 1 as active:

- Launch the Snow Commander Control Panel on Node 2.
- Switch to the DB Management tab and change the connection details to match those used by Node 1 to connect to the production database.
- Test the connection and start the Commander service on Node 2.
Commander Node 2 will start in warm standby mode. You will be able to log in to confirm the system is running, but not make any changes, as read-only DB credentials are used for the passive node's connection.
File System Replication
Some application data is stored on disk and will need to be replicated between nodes. There are many ways to achieve this, however Snow Software recommends using DFS replication.
DFS replication requires both nodes to be a member of the same domain and be joined to a DFS replication group. The group must replicate the folders below between the nodes.
Configure the folders listed below for DFS replication.

\Program Files\Embotics\Commander\reports\This folder is the location where custom, Snow-provided reports are stored. These reports are dropped in as JAR files to be automatically loaded into Commander on startup.
\Program Files\Embotics\Commander\scripts\This folder is the location where workflow scripts are stored.
\Program Files\Embotics\Commander\tomcat\publicThis folder is the location where custom themes and integrations are stored.
In addition, you can also configure the following:
\Program Files\Embotics\Commander\tomcat\reports\dataThis folder is the location where reports generated from Commander are stored.
\Program Files\Embotics\Commander\tomcat\wfpluginsThis folder is the location where plug-in workflow steps are stored and is needed only if you are using plug-in workflow steps.
If you have workflow scripts stored in another location. If this is the case, make sure to include that location in addition to those listed above.
- If you are using plug-in workflow steps, you must install the plug-in workflow steps on both Commander systems. To learn how to download and install workflow plug-in steps, see Add plug-in workflow steps to Commander.
- If you have modified the default cost files on one node, you must make the same modifications on the second node.
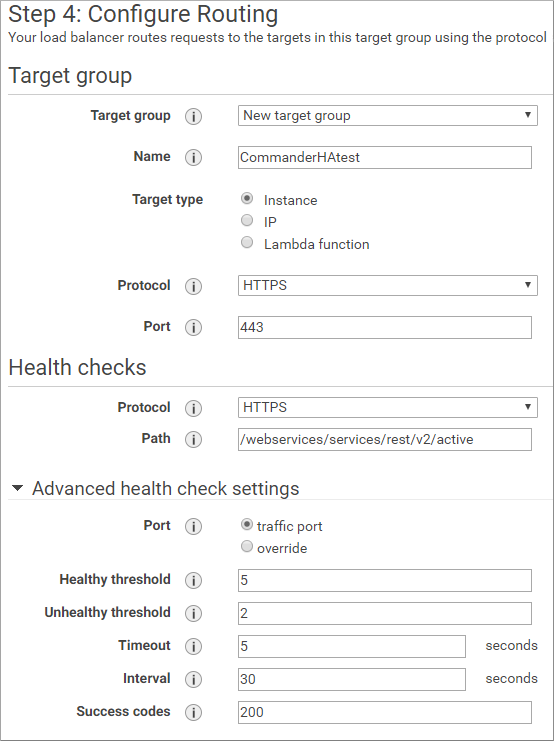
Configuring the Application Load Balancer
This guide assumes that you will be using an AWS Application Load Balancer (ALB). The ALB should be associated to your Commander SSL certificate and instances. The ALB must be configured for advanced health checks using the following parameters as a guideline.