You can set up a VM Access Proxy for users to provide them with remote access to their VMs while your virtualized infrastructure is secured behind a firewall.
This topic focuses on the latest version of the VM Access Proxy. For information on earlier versions, create a case through the Snow Support Portal.
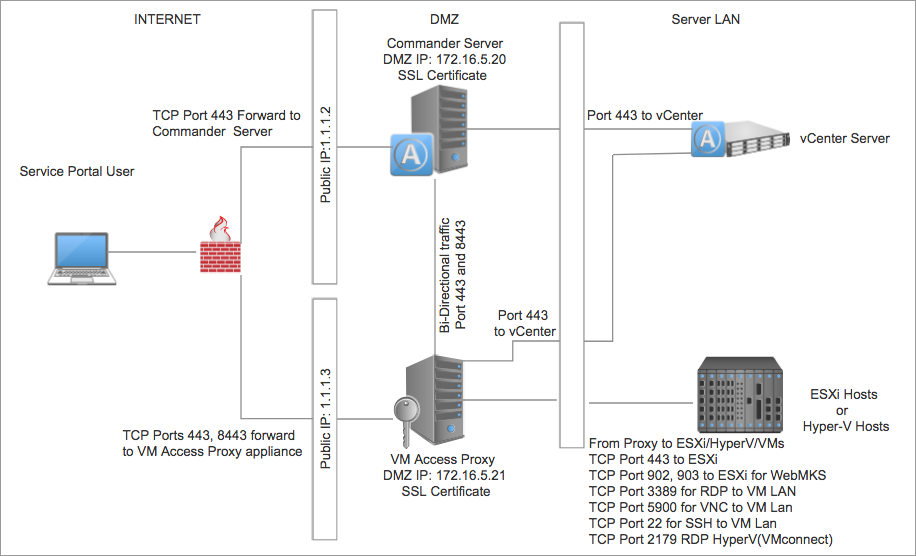
VM Access Proxy architecture
A VM Access Proxy must be deployed on a separate machine from Commander. The current VM Access Proxy runs in a container and can be deployed on a Linux machine that meets the requirements.
The following diagram provides an example deployment of a VM Access Proxy.
VM Access Proxy setup steps
The basic setup steps required to use a VM Access Proxy with Commander are:
- Meet host and network requirements
- Set up host server and install VM Access Proxy
- Add VM Access Proxies to Commander
Meet host and network requirements
To use the VM Access Proxy to establish connections to VMs outside your firewall, see the requirements listed below.
If you deployed an earlier version of the VM Access Proxy, we recommend doing a parallel install to replace VM Access Proxies. For instructions, as well as details on the compatibility between Commander and VM Access Proxy versions, see Upgrade Commander VM Access Proxy.
Host machine minimum requirements
Minimum requirements:
- Dedicated 64-bit Linux machine
Running the VM Access Proxy version 3.10 in a container hosted on Ubuntu Linux 20.04 is the only distribution and version fully supported by Snow Software. Errors may occur if other distributions don't have the required packages in the same locations.
- Version 3.10 or higher of the Linux kernel
- iptables version 1.4 or higher
- Docker engine 18.09+
- Docker-compose tool 1.8.0+
- 2 CPUs
The more CPUs available, the more concurrent connections the VM Access Proxy can handle.
- 2 GB memory
- 10 GB disk space
- Time synchronization using either an NTP server or vCenter host
Port requirements
- For secure RDP and secure SCVMM console connections, you must ensure that port 8443 is accessible (inbound to the VM Access Proxy).
- For secure vCenter console connections, you must open port 443 (inbound to the VM Access Proxy).
Publishing both the Service Portal and the VM Access Proxy to the Internet requires two IP addresses.
Networking requirements
In all connection scenarios, routes must exist between Commander and the VM Access Proxy. For vCenter and SCVMM, routes must exist between Commander, the VM Access Proxy, and the host (ESXi or Hyper-V). For RDP, SSH, and VNC connections, routes must exist between Commander, the VM Access Proxy, and the target VM.
Important: If users will access their VMs from the cloud account's network, as well as through the Service Portal published on the Internet, you must make sure DNS is configured correctly. This is because some network devices won't automatically route requests made to a public IP to its private IP. When on the same network as the cloud account and VM Access Proxy, DNS must resolve to their private IP addresses so the traffic doesn't try to leave the network. Over the Internet, DNS must resolve to their public IP addresses.
Other requirements
- Service Portal users must have the Open Console or the Open Remote Session permissions. See Customize Service Portal Roles for Users.
- Commander Admin Portal users must have Administrator or any Operator level of access rights on the VM. See Assign Access Rights to Administrative Users.
- While some load balancers and other network devices handle SSL offloading, the VM Access Proxy must always have the same certificate installed so that it can be presented to users initiating the connection. Other scenarios aren't supported.
- You may want to configure credentials for console connections. See Configure console credentials for connections to vCenter VMs.
VMRC isn't supported for secure console connections for vCenter 6.0 or higher.
Set up host server and install VM Access Proxy
A VM Access Proxy runs in a docker container and can be deployed on a Linux machine that meets the requirements.
You must perform the following steps to set up the host server and install a VM Access Proxy.
- Install the host server
- Install VM Access Proxy dependencies
- Configure port forwarding
- Restart the host server
- Install the VM Access Proxy
Running the VM Access Proxy container in Docker Swarm or Kubernetes is not supported.
Install the host server
- Install Ubuntu 20.04.
- Choose all default options, including enabling the OpenSSH server.
- Don't install the docker package as part of the OS install.
Install VM Access Proxy dependencies
The VM Access Proxy has dependencies that must be installed:
- The VM Access Proxy is installed and run as a Docker container, so the Docker engine and CLI tools are required.
- Java 8 is required for certificate management.
- The unzip utility is required to extract the downloaded VM Access Proxy archive, and Net Tools is required for Snow Software Support for troubleshooting.
- Get the latest package information:
sudo apt update
- Install the VM Access Proxy dependencies:
sudo apt install -y docker.io docker-compose openjdk-8-jre-headless unzip net-tools
- Add the current user to the “docker” group so the current user can run the docker commands without needing “sudo”:
sudo gpasswd -a $USER docker
Configure port forwarding
The VM Access Proxy listens on port 9443 for proxy connections. The following configuration will enable the host server to forward requests received on port 443 to 9443. For the configuration to be persisted across reboots, a configured script is run at server start up time to set the required rules in the OS firewall software.
Create an rc.local script to add the port forwarding rules
- Edit “/etc/rc.local“:
sudo vi /etc/rc.local
- And add the following content, save, and close it:
#!/bin/sh
iptables -t nat -A PREROUTING -p tcp --dport 443 -j REDIRECT --to-ports 9443
iptables -t nat -A OUTPUT -o lo -p tcp --dport 443 -j REDIRECT --to-ports 9443
- Set the execute permissions:
sudo chmod +x /etc/rc.local
Configure systemd unit to run the script at startup
- Edit “/etc/systemd.system/rc-local.service“:
sudo vi /etc/systemd/system/rc-local.service
- Add the following content, save, and close it:
[Unit]
Description=/etc/rc.local Compatibility
ConditionPathExists=/etc/rc.local
[Service]
Type=forking
ExecStart=/etc/rc.local start
TimeoutSec=0
StandardOutput=tty
RemainAfterExit=yes
SysVStartPriority=99
[Install]
WantedBy=multi-user.target
- Enable the systemd unit:
sudo systemctl enable rc-local
Restart the host server
Restart the host server to complete the configuration.
sudo reboot
Wait for the reboot to complete because the configuration must be in effect before continuing with the procedure.
Install the VM Access Proxy
- Go to the Snow Commander Support Downloads page to determine the correct URL to download the VM Access Proxy bundle.
- Run the following command on the server that will host the VM Access Proxy, but substitute the URL from the Snow Commander Support Downloads page:
wget https://sasnowcommanderpackages.blob.core.windows.net/installers/v8/v9/vmap/SnowAccessProxy-3.9.zip
- Create the directories that will contain the VM Access Proxy configuration and logs:
sudo mkdir -p /var/data/logs/ /var/data/conf/
- Set their group ownership to “docker”:
sudo chgrp docker /var/data /var/data/logs/ /var/data/conf/
- Extract the VM Access Proxy distribution, login to the Docker container registry, then build and start the VM Access Proxy:
unzip SnowAccessProxy-3.9.zip
cd ./SnowAccessProxy-3.9/
cat snow-proxy.token | docker login -u Pulls --password-stdin cmpcontainer.azurecr.io
docker-compose up -d
Optional configuration tasks
After you have deployed a VM Access Proxy, you may want to perform the following optional configuration tasks to improve security:
- Optional configuration tasks — The VM Access Proxy includes a self-signed certificate. However, if you want to use your own self-signed certificate, or one provided by a certificate authority, see Install SSL Certificates on VM Access Proxies.
- Change the Default Keystore Password
Add VM Access Proxies to Commander
After you have deployed a VM Access Proxy, you can add the deployed proxy to Commander so that Commander Admin Portal and Service Portal users can use it to connect to VMs. When you add a VM Access Proxy, you must configure the:
- VM session access options to offer users for connecting to VMs.
- Infrastructure that it will target.
VM session access options
You can set the VM session access options that you want the VM Access Proxy to provide to Commander Admin Portal and Service Portal users in the Open Connection menu.
In the following example, only direct connect session access options are enabled.

For this configuration, the Open Connection context menu for a Windows VM on vCenter would look like this in both the Admin Portal and the Service Portal:

If secure access options are enabled, in Commander the Open Secure commands are also displayed. For example, the following commands are available for a Windows VM on vCenter, when both Direct and Secure Proxy commands are enabled:

In the Service Portal, the Open Connection commands are the same, whether you've enabled the Secure Proxy commands or the Direct commands. That is, any secure options won't explicitly say "Secure".
Infrastructure to target
You can configure the infrastructure that the VM Access Proxy will target. By default, it will have a global target (that is, it will target your entire infrastructure). However, you can configure a proxy to target only a subset of that infrastructure. For example, you can select down to the cluster level for on-premise systems and to the region level for public cloud systems.
If you configure multiple proxies, you can set different infrastructure targets for each one. For example, you can configure a global proxy targeting the entire infrastructure, plus one or more secondary proxies targeting portions of your infrastructure.
The following image shows how the VM Access Proxy that's being added is targeting the entire infrastructure. Note, however, that among the grayed-out checkboxes "kermit" is enabled, which means that has already been targeted by another proxy.

Access: | Configuration > System |
Available to: | Commander Role of Superuser |
To add a VM Access Proxy and configure which VM connection commands are available to users:
- Click the Integration tab.
- On the Integration page, click Add > VM Access Proxy.
- On the Configuration page of the VM Access Proxy wizard, in the Proxy URL field, enter a fully qualified domain name (FQDN) for the VM Access Proxy Server that uses https and port 8443.
For example:
https://example.vmaccessproxy.com:8443
The URL you enter must resolve correctly both on your network and over the Internet. While some firewall configurations allow for traffic to leave and re-enter the network, typically you need an internal DNS record that resolves to the private IP and an external DNS record that resolves to the public IP address of the VM Access Proxy server.
- In the Name field, enter a name.
This name is used only to distinguish multiple VM Access Proxies. End users won't see this name.
- Optional: If the Commander server is hosted remotely with a cloud provider, such as AWS or Azure, without a persistent VPN, in IP address or hostname enter a valid IP address or hostname for the Commander server.
By default, an internal IP address is used to communicate with the Commander server installed on your local network, so in most cases this alternative IP address or hostname isn't required.
- To test the connection, click Test.
If the test is successful, the message "Connected to the VM Access Proxy" is displayed, along with the VM Access Proxy version. If you see an error, see Troubleshooting below.
- To enable the use of the VM Access Proxy after it has been configured, select Enabled.
- In the VM Session Access area, select the access options you want to provide in the Open Connection menu for Commander and Service Portal users:
- If your Commander users are inside your firewall, enable the Direct commands and disable the Secure Proxy commands.
- If your Service Portal users are customers outside your firewall, disable the Direct commands and enable the Secure Proxy commands.
While there's no harm in enabling both Direct and Secure Proxy commands for Commander users, reducing the number of available commands results in a simpler user experience.
- Click Next.
- On the Targets page, select the infrastructure that you want the proxy to target:
- If you want the proxy to target your entire infrastructure (that is, a global target), keep the default selection, Infrastructure view or the Applications view.
- If you want the proxy to target only a subset of your infrastructure, clear the Infrastructure view or the Applications view target and select one or more targets in the tree. You can select down to the cluster level for on-premise systems and to the region level for public cloud systems.
If a global proxy is already configured, the Infrastructure and the Applications views will be grayed out and can't be cleared; select one or more targets below the Infrastructure view or the Applications view level.
- Click Next.
- On the Summary page, review your changes and click Finish.
Troubleshooting
If you need to retrieve log files from the VM Access Proxy appliance for troubleshooting purposes, see the Snow Globe article Retrieving VM Access Proxy Logs.
When you have configured the VM Access Proxy and a user is unable to open a connection to a VM, the first troubleshooting step is to try to open a connection to the VM outside Commander and the Service Portal.
After configuring the VM Access Proxy, the first secure console connection attempt will fail, because it acts as a trigger to load required libraries. When you experience this issue, attempt a second secure console connection.
Potential errors displayed when testing a connection
Error message | Resolution |
|---|---|
Connection Error : VM Access Proxy host URL "<url>" must use https. | Check whether you used |
Connection Error : Failed to connect to "<url>". or VM Access Proxy received no response for host "<hostname or IP>": "<error message>" |
|
Connection Error : VM Access Proxy host URL "<url>" is not valid. | Make sure you typed the URL correctly. |
VM Access Proxy not found at "<hostname or IP>" | The specified host is valid, but the VM Access Proxy Service wasn't found on the host. Make sure you specify a host where the VM Access Proxy was installed. |
VM Access Proxy host not found: "<hostname or IP>" or Failed to connect to "<hostname or IP>" | The specified host isn't valid, or Docker container isn't running on the VM Access Proxy server. Make sure you specify a valid IP address or host name. |
VM Access Proxy failed to provide a valid SSL cert for host "<hostname or IP>": "<error message>" | The SSL certificate was not provided, or was not returned correctly. If an SSL certificate was provided as part of the installation process, try rebooting the VM Access Proxy host server. |
VM Access Proxy not found at "<url>" | Another service was found at the specified URL, but the VM Access Proxy Service wasn't found. Make sure you enter the URL for the VM Access Proxy Service. |
Failed to get a valid response from "<url>". Ensure the port is correct and try again. | Make sure you enter a port as part of the URL. |
Bad response from server | The VM Access Proxy service isn't running. Try restarting the service. |
Server returned HTTP response code: 500 for URL: <url>/RemoteAccess/details | The SSL certificate provided is invalid. |
Invalid Proxy URL | The proxy URL sometimes may not resolve unless a common root domain, such as .com or .net is used. |
VM Access Proxy Status Field Messages
VM Access Proxy Status | Details |
|---|---|
Running | This status is displayed when the VM Access Proxy is enabled and the service is running. |
Disabled | The VM Access Proxy is configured, but is disabled. To enable the VM Access Proxy, go to System > Integration tab. On the VM Access Proxy pane, click Edit. Select Enabled and OK. |
Not Configured | The VM Access Proxy hasn't been configured. |
Can't communicate with VM Access Proxy | The VM Access Proxy server isn't powered on. |
VM Access Proxy Error | The VM Access Proxy service isn't running, or a Tomcat error has occurred. To see Tomcat errors, click Edit to open the VM Access Proxy dialog and click Test. |
Disable or remove VM Access Proxy servers
Access: | Configuration > System |
Available to: | Commander Role of Superuser |
Disabling a proxy server makes the server unavailable for connections but saves the settings — you can return to the configuration dialog later and re-enable it.
Removing a proxy server clears the settings — you must reconfigure all of the settings if you want to reintegrate later.
In both cases, users can still open connections to VMs, but the connections don't go through the VM Access Proxy.
If you've configured multiple proxies, disabling or removing a proxy that targets a subset of your infrastructure means that another proxy that targets a higher level of your infrastructure now also targets the subset. Test the available VM commands to ensure that behavior is as expected throughout your infrastructure.
To disable a proxy server:
- Click the Integration tab.
- On the Integration page, locate the server you want to disable and click Edit.
- Clear the Enabled checkbox and click OK.
To remove a proxy server:
- Click the Integration tab.
- On the Integration page, locate the server you want to remove and click Remove.
- Click Yes to confirm the change.
