You can configure Commander to use BlueCat™ IP address management (IPAM) capabilities. When you integrate Commander with BlueCat™ IPAM as shown in this topic, you can create host records or DHCP reservations from BlueCat™ IPAM during provisioning with Commander.
To set this up, you need to:
- Create a set of credentials that has access to the BlueCat™ server.
- Connect Commander to a BlueCat™ server.
- Set up a completion workflow with a Configure OS Networking step, or add this step to an existing completion workflow.
The Configure OS Networking step is also supported in command workflows.
- Set up a decommissioning workflow to release the addresses when decommissioning VMs managed by BlueCat™
These tasks are explained in this topic. For an end-to-end example that includes BlueCat™ networking, see Automate VM Customization through Workflows.
Create system credentials for the BlueCat™ server
Access: | Configuration > Credentials |
Available to: | Commander Role of Superuser and Enterprise Admin |
- On the Credentials page, click Add.
- Enter the user name and password for a BlueCat™ account.
- For Description, enter "BlueCat", to serve as a memory aid to administrators when configuring tasks requiring credentials.
- From Category, choose System Credentials.
- Click OK.
Connect Commander to a BlueCat™ server
Access: | Configuration > System |
Available to: | Commander Role of Superuser |
- Click the Integration tab.
- On the Integration page, click Add > BlueCat™ IPAM Server.
- In the BlueCat™ IPAM Server dialog, enter the host name or IP address and port for the BlueCat™ server.
Both http and https protocols are supported. The default port is 80.
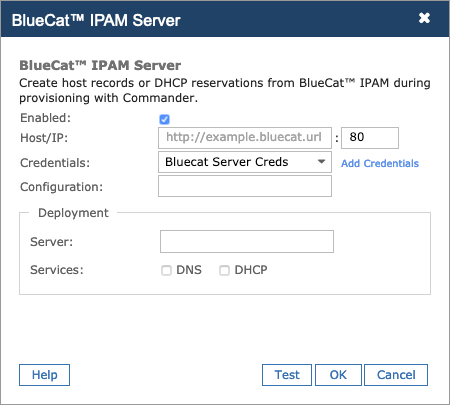
- From Credentials, choose the BlueCat™ credentials.
- In the Configuration field, enter the BlueCat™ configuration (the parent IPAM object).
- In the Server field, enter the DNS/DHCP server to deploy the changes to. You can add multiple servers as a comma-separated list.
- For Services, select DNS and/or DHCP as required.
- Click Test to test the connection.
Commander queries BlueCat™ to determine whether everything is set up correctly.
Commander connects to BlueCat™ only as needed; there's no continuous connection.
- Once you see a Success message, click OK to save the configuration.
Set up a completion workflow
Access: | Configuration > Self-Service |
Available to: | Commander Role of Superuser and Enterprise Admin |
- Click the Completion tab.
- Create a completion workflow.
- On the Name page, provide a name, and from Apply this workflow, select after a VM is deployed.
- On the Steps page, add a Configure OS Networking step.
- Give the step a descriptive name.
- From Credentials, select credentials or click Add Credentials.
Credentials for the VM are Guest OS Credentials. See Configure OS Networking Through Workflow Steps for guidance.
The credentials/account used to execute the OS network step in the workflow needs
sudoprivileges on the target VM, so the user must be able to runsudo. Commander supports interactivesudoprompts. Ensure that thesudoersfile on the VM doesn't contain the following line:Defaults requiretty.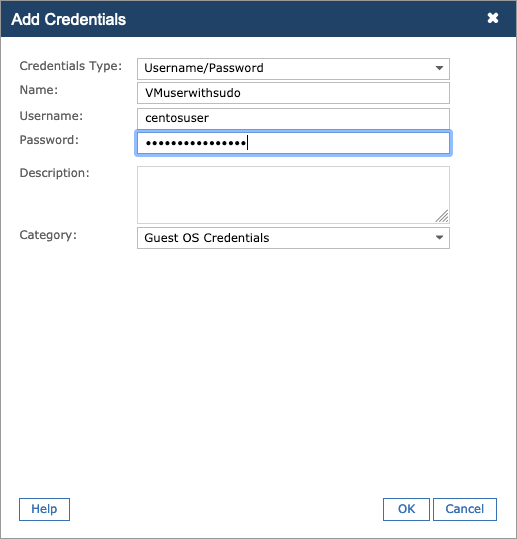
- From Assign IP, select From BlueCat™ IPAM.
- Enter networking details as required.
The Gateway, DNS View, Block, Network and Domain Name fields are mandatory.
- From Action, select Apply Settings to configure the VM in this step, or select Reserve Only to have the IP information recorded in the approval comments.
When you select Reserve Only, the output can be used as input to a subsequent Customize VM step in the workflow. Workflow errors are written to the workflow step comment log. See View the Status of Workflows for more information.
For information on completion workflows, see Create Completion Workflows.

Set up decommissioning workflows
When you use Commander to create host records or DHCP reservations from BlueCat™ IPAM during provisioning, it makes sense to release the addresses when decommissioning VMs.
Access: | Configuration > Self-Service |
Available to: | Commander Role of Superuser and Enterprise Admin |
- Click the Completion tab.
- Create a new completion workflow.
- On the Name page, provide a name, and from Apply this workflow, select after a Change Request is fulfilled.
- On the Steps page, add a Decommissioning Networking step (in the Guest OS category).
- On the Assigned Forms page, select Apply this workflow to the selected forms and select the Decommissioning Request form.
For full details on completion workflows, see Create Completion Workflows.
Disabe or remove the BlueCat™ server
Disabling an external server makes the server unavailable for connections but saves the settings, meaning that you can return to the configuration dialog later and re-enable it.
Removing an external server clears the settings, meaning that you must reconfigure all of the settings if you want to reintegrate later.
Access: | Configuration > System |
Available to: | Commander Role of Superuser |
To disable an external server:
- Click the Integration tab.
- On the Integration page, select the server you want to disable, and click Edit.
- Clear the Enabled checkbox, and click OK.
To remove an external server:
- Click the Integration tab.
- On the Integration page, select the server you want to remove, and click Remove.
- Click Yes to confirm the change.
