This topic provides examples of using workflow steps to automate the VM customization process. The first example involves fewer changes to your process; the other provides more flexibility.
In our example company:
- BlueCat™ IPAM is used for address management, with static DNS. (To learn how to integrate with BlueCat™, see Integrate BlueCat™ IP Address Management.)
- VMware customization specs are currently used to join the VM to a domain, using one customization spec for each domain. The customization specs are currently set to prompt for the IP address.
- VMware customization specs are also used to configure networking.
- The customization process is also used to run a Windows batch script to install software on deployed VMs.
In these examples, only the non-default settings are mentioned.
IMPORTANT: The first step in a component-level completion workflow for a new VM should be a Wait for Guest OS to Power On step, so that variables such as IP addresses have values before other steps are run. For Windows VMs, it may take longer than the default 300 seconds (five minutes) to obtain an IP address and DNS name. You may want to use two steps: one that waits for guest OS customization to complete, and one that waits for IP address and DNS name.
Solution 1: Fewer changes to existing process
Although there are no changes to customization specs, this solution is less flexible. With this solution, you need to set up a workflow for both Windows and Linux. The example below shows the setup for Windows only.
Edit the service catalog entry
You will edit a service catalog entry so that it no longer uses a customization spec.
- Go to Configuration > Self-Service, and select the Catalog tab.
- Click Edit for the appropriate service catalog entry, then under Component Blueprints, select the applicable service catalog component.
- On the Infrastructure tab, from Customization Spec, select None.

- Click Finish.

Create a component-level completion workflow
- Go to Configuration > Self-Service, click the Completion tab.
- On the Workflows page, click Add.
- In the Completion Workflow Configuration dialog, do the following:
- In the Name field, enter a name for the workflow.
- From the Apply this workflow drop-down list, select after a VM is deployed.
- Click Next.
- To wait for the IP address and DNS name to be assigned to the deployed VM, do the following:
- In the Step Order section, click Add > Wait For Event.
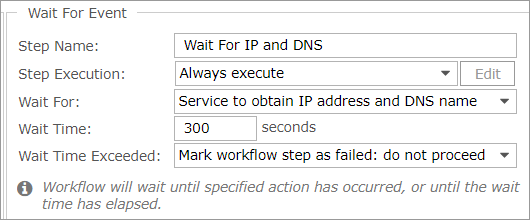
- In the Wait For Event step details section:
- For the Step Name, enter "Wait for IP and DNS".
- For Wait For, select Service to obtain IP address and DNS name.
- To make a call to BlueCat™ to obtain the IP address and assign network settings, do the following:
- In the Step Order section, click Add > Guest OS > Configure OS Networking.
- In the Configure OS Networking step details section:
- For the Step Name, enter "Configure BlueCat Networking".
- For Credentials drop-down, select the applicable credentials or click Add Credentials. See Prerequisites for guidance.
- For Assign IP, select FromBlueCat™ IPAM.
- For Action, select Reserve Only. This setting records the IP information in the approval comments.
If you select Apply Settings (as shown in the next solution), the settings are applied as part of the workflow step.
- Enter networking details as required. The Gateway, DNS View, Block, Network and Domain Name fields are mandatory.

For Windows VMs, it may take longer than the default 300 seconds (five minutes) to obtain an IP address and DNS name. So you may want to use two steps: one that waits for guest OS customization to complete, and one that waits for IP address and DNS name.
- To power off the VM, do the following:
- In the Step Order section, click Add > Perform Power Action.
- In the Perform Power Action step details section:
- In the Step Name field, enter "Stop VM".
- For Action, select Stop.

- To wait for the VM to power off, do the following:
- In the Step Order section, click Add > Wait For Event.
- In the Wait For Event Step Details section:
- In the Step Name field, enter "Wait for power off".
- For Wait For, select Service to power off.

- To run a customization process, do the following:
- In the Step Order section, click Add > Guest OS > Customize VM.
- In the Customize VM step details section:
- For Step Name, enter "Customize VM".
- For Customization Spec, select the appropriate customization spec.

- To wait for the customization process to complete, do the following:
- In the Step Order section, click Add > Wait For Event.
- In the Wait for Event step details section:
- For Step Name, enter "Wait for customization".
- For Wait For, select Guest OS customization to complete.
- For Wait Time, enter at least 1800 seconds for Windows (the default 300 seconds is appropriate for Linux).

- To wait for the IP address and DNS name to be assigned to the deployed VM, do the following:
- In the Step Order section, click Add > Wait For Event.
- In the Wait For Event step details section:
- For Step Name, enter "Wait for IP and DNS 2".
- For Wait For, select Service to obtain IP address and DNS name.

- To send an email to inform people that the VM is ready, do the following:
- In the Step Order section, click Add > Send Email.
- In the Send Email step details section:
- For Address List, enter one or more email addresses (separate multiple addresses with semicolons).
- For Email Subject, enter a subject.
- For Email Body, enter the required information.

- Now that you've added all of the workflow steps, click Next.
- On the Assigned Components page, do the following:
- Select Apply this workflow to the selected components, then select the components that you want to apply the workflow to.
- Click Next.
- On the Summary page, do the following:
- For Description of Changes, enter details about the workflow.
- Click Finish.
Solution 2: More flexibility
In this solution, you modify customization specs using workflow steps to do more of the customization work.
Integrate Commander with BlueCat™
Create credentials and connect Commander to a BlueCat™ server as detailed in Integrate BlueCat™ IP Address Management.
Modify your customization specs
Edit your customization specs so that:
- The IP address is set to 1.1.1.1, instead of prompting for the IP address.
- The VM isn't joined to a domain.
Assign customization specs to the proper service catalog entries
- Go to Configuration > Self-Service, and click the Catalog tab.
- Edit the service catalog entry, and on a Component Blueprints page, make a selection from the Customization Spec menu.
- Click Edit for the appropriate service catalog entry, then under the Component Blueprints, select the appropriate service catalog component and make a selection from the Customization Spec menu.
- Click Finish.
Create a component-level completion workflow
- Go to Configuration > Self-Service, and click the Completion tab, then click Add.
- In the Completion Workflow Configuration dialog, do the following:
- In the Name field, enter a name for the workflow.
- From the Apply this Workflow drop-down, select after a VM is deployed.
- Click Next.
- To wait for customization to complete, do the following:
- In the Step Order section, click Add > Wait For Event.
- In the Wait For Event step details section:
- For Step Name, enter "Wait for Sysprep to complete".
- For Wait For, select Guest OS customization to complete.
- In the Wait Time field, enter the amount of time for the event to complete. For Windows, enter at least 900 seconds. For Linux, the default 300 seconds is appropriate.

For Windows VMs, you may want to use two steps: one that waits for guest OS customization to complete, and one that waits for IP address and DNS name.
- To wait for the VM to power on, do the following:
- In the Step Order section, click Add > Wait For Event.
- In the Wait For Event step details section:
- For Step Name, enter "Wait for power on".
- For Wait For, select Guest OS to power on.

- To make a call to BlueCat™ to obtain the IP address and assign network settings, do the following:
- In the Step Order section, click Add > Guest OS > Configure OS Networking.
- In the Configure OS Networking step details section:
- For Step Name, enter "Configure BlueCat Networking".
- For Credentials, select credentials or click Add Credentials. See Configure OS Networking Through Workflow Steps for guidance.
- For Assign IP, select From BlueCat™ IPAM.
- For Action, select Apply Settings.
If you select Reserve Only (as shown in the previous solution), the IP information is recorded in the approval comments. The output can be used as input to a subsequent Customize VM step in the workflow.
- Enter networking details as required. The Gateway, DNS View, Block, Network, and Domain Name fields are mandatory.

- To wait for 30 seconds, do the following:
- In the Step Order section, click Add > Wait For Event.
- In the Wait For Event step details section:
- For Step Name, enter "Wait for 30 seconds".
- For Wait For, select Time to elapse.
- For Wait Time, enter "30".

- To join the VM to the Windows domain, do the following:
- In the Step Order section, click Add > Guest OS > Join Domain.
- In the Join Domain step details section:
- For Step Name, enter "Join to Windows domain".
- For Guest OS Credentials, select the applicable credentials or click Add Credentials.
- Leave the Restart Guest OS option enabled.
- Enter a domain name and select the appropriate domain credentials.

- To wait for IP address and DNS name assignment, do the following:
- In the Step Order section, click Add > Guest OS > Wait for Event.
- In the Wait For Event step details section:
- For Step Name, enter "Wait for IP and DNS".
- For Wait For, select Service to obtain IP address and DNS name.

For Windows VMs, you may want to use two steps: one that waits for guest OS customization to complete, and one that waits for IP address and DNS name.
- To give the PV domain group permissions on the deployed VM, do the following:
- In the Step Order section, click Add > Guest OS > Run Program.
- In the Run Program step details section:
- For Step Name, enter "Grant QA permissions".
- For Credentials, select the appropriate credentials or click Add Credentials. See Configure OS Networking Through Workflow Steps for guidance.
- For Command Line, enter a command for granting permissions.

- To run a script that installs Microsoft Security Essentials on the deployed VM, do the following:
- In the Step Order section, click Add > Guest OS > Run Program.
- In the Run Program step details section:
- For Step Name, enter "Install software".
- For Credentials, select the applicable credentials or click Add Credentials. See Configure OS Networking Through Workflow Steps for guidance.
- For Command Line, enter a command for installing software.

- Now that you've added all of the workflow steps, click Next.
- On the Assigned Components page, do the following:
- Select Apply this workflow to the selected components, then select the components that you want to apply the workflow to.
- Click Next.
- On the Summary page, do the following:
- For Description of Changes, enter details about the workflow.
- Click Finish.
