You can integrate Puppet's automation software with Commander to automate repetitive configuration tasks for provisioning VMs. Requested VMs can be automatically deployed and configured as Puppet nodes. You can create workflows that specify the configuration for a node in the Puppet master. You can also set up automatic VM decommissioning driven by expiry date or a change request process, including removal of the node configuration from the Puppet master.
If you have integrated with the Puppet Labs® IT automation system, a Puppet tab appears in the Infrastructure and Applications views for any VMs identified as Puppet nodes. This tab displays environment, group, class, and variable information.
If the tab contains no information, or if you want to retrieve new information, click Refresh Puppet Information.
How Commander works with Puppet
Commander integrates with Puppet using Puppet's REST API.
Commander communicates only with the Puppet master. It doesn't communicate directly with Puppet agents, nor does it apply Puppet configuration to agents. You can use a Commander completion workflow to apply the configuration to the provisioned Puppet node immediately. Or, your completion workflow can configure the Puppet master, and leave the configuration of the newly provisioned VM to the Puppet infrastructure.
Commander uses variable substitution to identify Puppet nodes in your infrastructure. For example, if your Puppet node name format is <dns_name>.pv.example.com, when you integrate with Puppet, you use #{target.dnsName}.pv.example.com to tell Commander how to identify nodes. Commander communicates with the Puppet master to obtain a list of registered node names and then compares them with VM names in your infrastructure. When Commander finds a match, it marks the VM as a Puppet node.
Assign classes to nodes indirectly by assigning groups to nodes, rather than directly assigning classes to nodes. If you use the Configure Puppet workflow step to assign classes and variables to a node, Commander creates a group with the same name as the node and pins the node to the group. A parent group named "vCommander" is also created to contain these groups.
Integrating Commander with Puppet allows you to:
- set the Puppet configuration in the Commander service catalog
- optionally, present Puppet configuration choices to end users when requesting new services
- configure Puppet-specific workflow steps for common functions such as authorizing nodes and supplying the environment, groups and variables for node configuration
- access VM configuration, metadata and request form data when configuring a node in the Puppet master
- identify Puppet nodes and view their configuration in Commander and the Service Portal
- synchronize with the Puppet server on a configurable schedule
Commander doesn't display Puppet class parameters.
Authentication with the Puppet server
When Commander executes commands on the Puppet Master through SSH, Commander uses sudo if the user name of the credentials used to add the Puppet server isn't "root". Commander supports interactive sudo prompts.
Version of Puppet supported
For information on the lasted supported Puppet Enterprise version, see Third-party integrations. Commander also works with Puppet Open Source 4.2 or higher. If you have the Open Source edition, you must install and configure the Puppet Console on your Puppet Master so that Commander can communicate with it.
Overview of tasks
The tasks involved in integrating with Puppet are:
- Enable the node check-in storage parameter
- Generate a certificate for the Commander server
- Create credentials
- Add the Puppet server to Commander
- Configure Puppet information for service catalog components
- Optional: Allow users to specify Puppet groups on the request form
- Edit the example completion workflow for new requests
- Set up a decommissioning workflow for Puppet nodes
- Optional: Adjust the schedule for Puppet synchronization
Enable the node check-in storage parameter
The node check-in storage parameter is disabled by default to help reduce loads in more complex environments. Before using the check-in history endpoint, you must enable node check-in storage.
To enable node check-in storage:
In the puppet_enterprise::profile::console class, set the classifier_node_check_in_storage parameter to true for the master server.
Generate a certificate for the Commander server
To allow Commander to communicate with Puppet, you must generate a certificate for the Commander server.
For more information on how Commander communicates with Puppet, see Forming Node Classifier Requests in the Puppet documentation.
By default, configuration data is stored at /etc/puppetlabs on the Puppet server. If your configuration data is stored elsewhere, adjust the file paths in this procedure.
- Open an SSH connection to the Puppet server.
- Generate a certificate for the Commander server with the following command:
puppet cert --generate <Commander hostname>
- To add the Commander server to the whitelist, add a new line containing the Commander host name to the following file:
/etc/puppetlabs/console-services/rbac-certificate-whitelist
- Restart the Puppet service pe-console-services for the whitelist change to take effect:
sudo service pe-console-services restart
- Make a copy of the following files, which you need when integrating Puppet with Commander:
- Puppet's CA certificate:
/etc/puppetlabs/puppet/ssl/certs/ca.pem - The Commander you just generated:
/etc/puppetlabs/puppet/ssl/certs/<Commander_hostname>.pem - The Commander private key you just generated:
/etc/puppetlabs/puppet/ssl/private_keys/<Commander_hostname>.pem
- Puppet's CA certificate:
Create credentials
Access: | Configuration > Credentials |
Available to: | Commander Role of Superuser and Enterprise Admin |
You need to create four sets of credentials in the System category:
- credentials for an account that Commander can use to open an SSH connection to the Puppet server
- credentials to store the Puppet CA certificate
- credentials to store the Commander certificate you created above
- credentials to store the Commander private key you created above
Create credentials for Commander to SSH to the Puppet server
- On the Credentials page, click Add.
- Leave the default credential type, Username/Password.
- Enter the user name and password for an account that Commander can use to open an SSH connection to the Puppet server.
- For the description, enter "Puppet", to serve as a memory aid to administrators when configuring tasks requiring credentials.
- From Category, select System Credentials.
- Click OK.
Create credentials to store the Puppet CA certificate
- On the Credentials page, click Add.
- In the Add Credentials dialog, from Credential Type, select RSA Key.
- In the Username field, enter a descriptive label for this certificate (for example, "Puppet CA Certificate").
- In the RSA Key field, paste the entire contents of the file you copied from
/etc/puppetlabs/puppet/ssl/certs/ca.pem. - Optionally, enter a description.
- From Category, select System Credentials.
- Click OK.
Create credentials to store the Commander certificate
- On the Credentials page, click Add.
- For Credential Type, select RSA Key.
- In the Username field, enter a descriptive label for this certificate (for example, "Commander Certificate").
- In the RSA Key field, paste the entire contents of the file you copied from
/etc/puppetlabs/puppet/ssl/certs/<Commander_hostname>.pemand optionally enter a description. - For Category, select System Credentials.
- Click OK.
Create credentials to store the Commander private key
- On the Credentials page, click Add.
- For Credential Type, select RSA Key.
- In the Username field, enter a descriptive label for this certificate (for example, "Commander Private Key").
- In the RSA Key field, paste the entire contents of the file you copied from
/etc/puppetlabs/puppet/ssl/private_keys/<Commander_hostname>.pem. - Optionally enter a description.
- For Category, select System Credentials.
- Click OK.
Add the Puppet server to Commander
Access: | Configuration > System |
Available to: | Commander Role of Superuser |
To add a Puppet server:
- Click the Integration tab.
- On the Integration page, click Add > Puppet Server.
- In the Puppet Server dialog, in the SSH Host/IP field, enter the host name or IP address and port number for the Puppet server. The default port is 22.
All commands are executed by opening an SSH connection on the Puppet master, executing the command, gathering the output and terminating the connection.
- From SSH Credentials, select the Puppet credentials you created above.
- The Puppet API Host/IP field is auto-populated with what you entered for the SSH Host/IP field. Edit this value if required.
- From Puppet CA Certificate, select the Puppet CA certificate credentials you created above.
- From Commander Certificate, select the Commander certificate credentials you created above.
- From Commander Private Key, select the Commander private key credentials you created above.
- The Node Name field allows Commander to match any VMs currently managed by Commander to nodes registered with the Puppet master. The field is prepopulated with the variable
#{target.dnsName}, which returns the DNS name of the VM. If you have a different naming convention for Puppet nodes, enter it.In any text field that supports variables, click to open the script editor and select variables for the current context.
- Click Test to test the connection.
Commander tries to establish an SSH connection to the specified server and look up the default group on the node classifier. This test doesn't verify the Node Name.
- Once you see a Success message, click OK to save the configuration.
Commander then creates and runs the Puppet Synchronization task. This task retrieves the currently configured node groups and node classes from the Puppet server. It also matches any VMs currently managed by Commander to nodes registered with the Puppet master.
You can double-click the Puppet Synchronization task in the Tasks tab at the bottom of the Commander console to view the associated events. Or, go to the Events tab. The following image shows that Commander found Puppet classes, groups, and environments.

This task is scheduled to run nightly. See Synchronizing with Puppet and Adjusting the Synchronization Schedule below for more information.
Configure Puppet information for service catalog components
Access: | Configuration > Self-Service |
Available to: | Commander Roles of Superuser and Enterprise Admin |
You can predefine the Puppet environment as well as Puppet classes and groups in the service catalog. You can then use variables to pass these values to a completion workflow that instructs the Puppet master to apply the configuration to requested VMs (as explained later in this topic).
Assign classes to nodes indirectly by assigning groups to nodes, rather than directly assigning classes to nodes. If you use the Configure Puppet workflow step to assign classes and variables to a node, Commander creates a group with the same name as the node and pins the node to the group. A parent group named "vCommander" is also created to contain these groups.
If you have upgraded from vCommander version 5.2 or earlier, predefining Puppet classes and groups in the service catalog requires you to use the Blueprint catalog model.
If you want to allow users to specify Puppet groups on the request form (as shown in the next section), the values you select appear as default values on the form.
To configure Puppet information for service catalog components:
- Click the Catalog tab.
- Locate the service in the list and click Edit.
- Go to the component's page in the wizard. If you have integrated with Puppet, you should see Puppet tab.
- Click the component's Puppet tab. All environments, classes and groups retrieved from the Puppet server are displayed.

- Select an environment from those listed. The default environment is production.
If the production environment doesn't exist and you don't select another environment, class and group selections will have no effect.
Once you select an environment, only those classes and groups found in that environment are available for selection.
- As required, select one or more classes and groups from the pick lists. Ctrl-click to select multiple classes and groups. If you don't select classes or groups, no default values are applied.
Assign classes to nodes indirectly by assigning groups to nodes, rather than directly assigning classes to nodes.
- If you want to allow users to select Puppet groups when requesting this service, continue to the next section. Otherwise, click Finish.
Optional: Allow users to specify Puppet groups on the request form
If you want to allow users to specify Puppet groups when requesting a new service, edit the service catalog entry. In this example, you want users to specify Puppet groups for new VMs. You can then use the groups selected on the form as input to a VM completion workflow or command workflow (which you'll create next).
If you want to customize the list of groups on the form, instead of using the Puppet Groups form elements, you can create a list-type custom attribute for use on the form instead. You can also use a list-type custom attribute to allow users to select an environment on the form, but this only makes sense if groups are the same across all environments. For more information, see Work with Custom Attributes.
Access: | Configuration > Self-Service |
Available to: | Commander Roles of Superuser and Enterprise Admin |
Allow users to select Puppet groups, rather than individual classes.
To allow users to specify Puppet groups on the request form:
- Click the Catalog tab.
- Continuing from the previous procedure, in the Service Catalog entry, click the Form tab.
- In the Toolbox at the right side of the page, under Puppet, click the Puppet Groups form element.
- In the newly added component, optionally enter a custom display label for the form element.
- From the Selectable Values list, Ctrl-click all values you want to allow users to select.
- If you want the values users select to be merged with the defaults you specified, clear Override Default Values. If you want users to be able to override the defaults you selected on the Puppet tab, enable Override Default Values.
- If you want users requesting a service to be able to override the defaults you specify, enable Override Default Values.
- If you don't want users requesting a service to be able to override the defaults you specify, clear Override Default.
- To force users to select one or more values, enable Required.
When this element is required, a user must select at least one value, even if you have already configured default values.
- To allow users to select multiple values, enable Select Multiple.
- Click OK and Save.
- To test your form, go to Configuration > Self-Service > Forms. Select the Default Service form in the list and click Preview. In the list of services, select the service you configured for Puppet.
Edit the example completion workflow for new requests
Access: | Configuration > Self-Service |
Available to: | Commander Role of Superuser and Enterprise Admin |
Commander includes three example Puppet workflows.
If you use rules to set node groups, or if you use Hiera, customize the Puppet for Linux Basic Example workflow. This workflow installs the Puppet agent and authorizes the node.
If you want to preassign the environment, groups, or classes to the new node for the first communication between the Puppet master and the agent, customize the Puppet for Linux Advanced Example workflow as shown in this section. This workflow creates the Puppet node, installs and configures the Puppet agent on the VM, and configures the Puppet master.
To use any of the example workflows, you must add Guest OS credentials. See Workflow Steps Reference for credentials guidance. Once you've customized a completion workflow, you can copy it and make modifications for other operating systems.
Prerequisite: Ensure that the VM's networking and host name are properly configured, either through a customization spec or through workflow steps. For more information, including guidance on credentials, see Configure OS Networking Through Workflow Steps.
- For Windows VMs, it may take longer than the default 300 seconds (five minutes) to obtain an IP address and DNS name. You may want to use two steps: one that waits for guest OS customization to complete, and one that waits for IP address and DNS name.
- The Authorize Node action of the Configure Puppet step authorizes communication between the Puppet master and the Puppet node. This action isn't required if the Puppet master is configured to authorize all new nodes, because the master will authorize communication as soon as the agent connects to it.
For Linux
Before you begin, make sure that the autosign setting in puppet.conf is enabled.
To customize the Puppet for Linux Advanced Example workflow:
- Click the Completion tab.
- On the Completion page, select the completion workflow and click Edit.
- On the Name page, customize the name if you want.
- On the Steps page, the steps are preconfigured. If you select a step, its configuration parameters are displayed in the Details area to the right.
- The starting Wait for VM to Be Ready step waits for the service to obtain an IP address and DNS name.
(A similar step would be set through Add > Guest OS > Copy File.)
- The Install Puppet Client step installs the Puppet agent on the new VM. Note that if the agent has already been installed on the source template, the template just needs to be configured to use the new node name.
(A similar step would be set through Add > Guest OS > Run Program.)
- Credentials: Select the appropriate credentials or click Add Credentials. See Workflow Steps Reference for credentials guidance.
- Command Line: Enter the following:
curl -k https://#{integrations.puppet.address}:8140/packages/current/install.bash | bash

- The Copy puppet.conf step configures the Puppet agent.
(A similar step would be set through Add > Wait for Event).
When you integrate a Puppet server, an example configuration file is saved to:
#{system.directory}\public\puppet.confwhere
#{system.directory}is the location of the Tomcat directory in your Commander installation.You can customize this configuration file. The default file looks similar to the following:
[main]
logdir = /var/log/puppet
rundir = /var/run/puppet
server = pe.example.com
[agent]
report = true
classfile = $vardir/classes.txt
localconfig = $vardir/localconfig
pluginsync = true
The server line in the configuration file references the Puppet master server.
Do the following in the details pane:
- Credentials: Select the appropriate credentials from the list or click Add Credentials. See Workflow Steps Reference for credentials guidance.
- Destination: Customize the path to the Puppet agent installation on the target VM, if necessary.

- The Start Puppet Agent step comes next:
(A similar step would be set through Add > Guest OS > Run Program.)
- Credentials: Select credentials from the menu. The Configure Puppet step uses the credentials you created for communications with the Puppet server. See Workflow Steps Reference for credentials guidance.
- Command Line: Customize the following entry, if necessary:
service puppet start
- Next comes two instances of the Configure Puppet step. They are Set Environment and Set Groups.
(Similar steps would be set through Add > Guest OS > Configure Puppet.)
- The Set Environment step sets an environment in the Puppet master for this VM.
- The Node field is prepopulated with the value entered for Node Name during integration with Puppet.
You can enter either comma-separated values or Commander variables for the environment. Since you specified default values for Puppet Environment in the service catalog entry, you can retrieve this information with the following variables:
#{target.settings.puppet.environment}

- The Set Groups step sets the node groups this node belongs to.
You can enter either comma-separated values or Commander variables for groups. Since you specified default values for Puppet Group in the service catalog entry and you added Puppet Groups to the request form, you can retrieve this information with the following variables:
#{target.settings.puppet.groups}

- Click Next.
- On the Assigned Components page, select the service components that you want to assign to the workflow.

- Click Next.
- Review the information on the Summary page and click Finish.
For Windows
Before you begin, make sure that the autosign setting in puppet.conf is enabled.
To customize the Puppet for Windows Basic Example workflow:
- Click the Completion tab.
- On the Completion page, select the completion workflow and click Edit.
- On the Name page, customize the name if you want.
If you select a step on the Steps page, its configuration parameters are displayed in the Details area to the right.
- The starting Wait for VM to Be Ready step waits for the service to obtain an IP address and DNS name.
(A similar step would be set through Add > Wait For Event.)
It may take longer than the default 300 seconds (five minutes) to obtain an IP address and DNS name. You may want to use two steps: one that waits for guest OS customization to complete, and one that waits for IP address and DNS name.
- The Install Puppet Client step installs the Puppet agent on the new VM. Note that if the agent has already been installed on the source template, the template just needs to be configured to use the new node name.
(A similar step would be set through Add > Guest OS > Run Program.)
- Credentials: Select the appropriate credentials or click Add Credentials. See Workflow Steps Reference for credentials guidance.
- Command Line: Customize the following:
msiexec /qn /norestart /i https://downloads.puppetlabs.com/windows/puppet6/puppet-agent-x64-latest.msi PUPPET_MASTER_SERVER=example.puppet.server.address PUPPET_CA_SERVER=example.puppet.server.addressBefore running the workflow, you must replace both instances of
example.puppet.server.addresswith the appropriate addresses for your puppet master server and CA server (the address may be the same for both).
- The Run Agent step comes next:
(A similar step would be set through Add > Guest OS > Run Program.)
- Credentials: Select credentials from the menu. The Configure Puppet step uses the credentials you created for communications with the Puppet server. See Workflow Steps Reference for credentials guidance.
- Command Line: Customize the following entry, if necessary
"C:\Program Files\Puppet Labs\Puppet\bin\puppet_shell.bat" agent -t
- Click Next.
- On the Assigned Components page, select the service components that you want to assign to the workflow.
- Click Next.
- Review the information on the Summary page and click Finish.
Workflow errors are written to the workflow step comment log. For more information, see View the Status of Workflows.
For more details on completion workflows, see Create Completion Workflows.
Set up decommissioning workflows for Puppet nodes
Access: | Configuration > Self-Service |
Available to: | Commander Role of Superuser and Enterprise Admin |
This example configures the Puppet master to delete the Puppet node, powers off the node and deletes the node from disk.
The example completion workflow uses the following steps:
- Delete Node
- Power Off
- Perform Remove Action
To set up a decommissioning workflow for Puppet nodes:
- Click the Completion tab.
- On the Workflows tab, click Add.
- On the Name page, provide a name such as "Decommission Puppet Node", and from Apply this Workflow, select after a Change Request is fulfilled, then click Next.
- On the Steps page, add the following three steps:
- Delete Node
- Power Off
- Perform Remove Action
- Add an Execute SSH Command step to configure the Puppet master to delete the node.
Select Add > Execute SSH Command, then in the details pane, do the following:
- In the Step Name field, optionally, change the name to "Delete Node".
- From Credentials, choose the proper credentials. This step requires Guest OS credentials, so you must create a copy of the credentials used to integrate with Puppet, which are System credentials.
- In the Host field, enter the host name of the Puppet server. For releases 8.1 and later, you can set the port value using either a fixed integer or a variable. The default is port 22.
- In the Command Line field, type the following:
sudo puppet node purge #{target.dnsName}
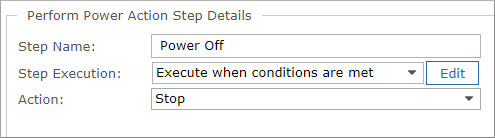
- Add a Perform Power Action step with a Stop action that will execute only on running VMs.
Select Add > Perform Remove Action, then in the details pane, do the following:
- In the Step Name field, optionally, change the name to "Power Off".
- For Step Execution, select Execute when conditions are met then click Edit.
- Enter the following condition, then click OK.
#{target.state} -eq "Running"
For more information on conditional steps, see Make Workflow Steps Conditional.
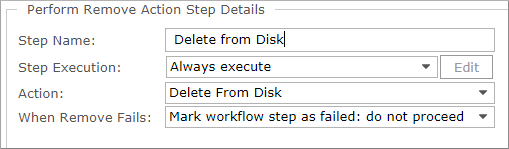
- Now add a Perform Remove Action step with a Delete from Disk action.
- Select Add > Perform Remove Action. In the details pane, in the Step Name field, type a step name of "Delete from Disk", then use the default settings.
- Click Next.
- On the Assigned Forms page, select your Decommissioning form.
- Click Next and Finish.
Now when a decommissioning change request is fulfilled, this workflow will run.
What happens next
At this point, you have two options:
- Add an Execute SSH Command step to your Puppet completion workflow, with a command line that applies the configuration to the Puppet node immediately.
- Wait for the Puppet agent to connect to the Puppet master, at which point the agent will download its configuration and apply it.
View Puppet node configuration for a VM
Access: | Views > Inventory > Infrastructure or Applications |
Available to: | Administrator and All Operator Levels of Access Rights |
When Commander identifies a VM as a Puppet node, a Puppet tab is added to the Guest OS Details pane for the VM.
The name displayed on the Puppet tab is the name of the node found on the Puppet master.
Initially, the Puppet tab contains no information. Click Refresh Puppet Information to retrieve the intended environment, class, group and variable configuration for this node from the Puppet master.

Once you have retrieved the configuration for a Puppet node in Commander, the information appears for Service Portal users. Service Portal users see the Refresh Puppet Information button for VMs identified as Puppet nodes as well.
Synchronize with Puppet and adjust the synchronization schedule
Access: | Tools > Scheduled Tasks |
Available to: | All Access Rights Levels Superuser can Override Schedules |
When you integrate with a Puppet server, Commander creates and runs a Puppet Synchronization task, to retrieve the currently configured environment, groups, classes and variables from the Puppet server, as well as match any VMs currently managed by Commander to nodes registered with the Puppet master.
The task is scheduled to run nightly at 12:30 a.m.
To synchronize manually:
- On the Scheduled Tasks page, select the Puppet Synchronization task.
- Click Run Now.
Depending on how you use Puppet and how much churn there is in your Puppet environment, you may want to synchronize less frequently, synchronize once and then disable the task, or not synchronize at all.
To disable the task or change its schedule:
- On the Scheduled Tasks page, select the Puppet Synchronization task and click Edit.
- To disable the scheduled task, clear the Enabled checkbox.
- To change the schedule, edit the Frequency and/or the Recurrence.
It's not possible to delete this scheduled task, but the task is automatically deleted if the Puppet server integration is removed.
Disable or remove Puppet servers
Access: | Configuration > System > Integration tab |
Available to: | Commander Role of Superuser |
Disabling the Puppet server makes the server unavailable for connections but saves the settings, meaning that you can return to the configuration dialog later and re-enable it. Disabling the server also disables the scheduled Puppet synchronization task. The Puppet tab on the VM's Guest OS Details pane remains visible, but users won't be able to refresh Puppet information. The settings on the Puppet tab and the Form tab in the service catalog are also preserved.
Removing the Puppet server clears the settings, meaning that you must reconfigure all of the settings if you want to reintegrate later. Removing the Puppet server also removes the scheduled Puppet synchronization task and the Puppet tab on the VM's Guest OS Details pane.
To disable the Puppet server
- On the Integration page, locate the Puppet server and click Edit.
- Clear the Enabled checkbox and click OK.
To remove the Puppet server
- On the Integration page, locate the Puppet server and click Remove.
- Click Yes to confirm the change.
