Manage the Snowboard
The Snowboard shows a quick overview of the status of devices and deployments. The Snowboard can be used to supervise the domain and is provided using widgets, that is, small objects with tools and content of various nature.
The Snowboard can be enabled and disabled, see Edit General settings.
Initially, the Default Snowboard is empty. It is possible to add and remove widgets to the Default Snowboard. It is also possible to create a new Snowboard with a custom set of widgets.
The Default Snowboard can be deleted. However, there must be at least one Snowboard.
Edit current Snowboard
Click Edit current Snowboard.
Add, configure, move or remove widgets according to the following sections.
Click Save.
Add widget
Click Add widget.
The Add widget dialog box appears.
Select a widget.
The Settings tab is displayed in the Add widget dialog box.
Configure the settings for the widget:
Optionally, edit the Title.
Select the Size.
If needed, select additional configurations.
Click Add.
Change size of widget
In the top left corner of the widget, click the Configure widget
 icon.
icon.A menu appears.
Select a new Size.
Edit widget
In the top left corner of the widget, click the Configure widget
icon.A menu appears.
Click Edit widget.
The Edit widget dialog box appears.
Configure the settings for the widget and then click Apply.
Move widget
Point to the header of the widget.
Drag the widget to the new position on the Snowboard.
Remove widget
In the top left corner of the widget, click the Configure widget
icon.A menu appears.
Click Remove widget.
Create Snowboard
Click Create Snowboard.
The Create Snowboard dialog box appears.
Type a name for the new Snowboard in the Name your Snowboard box.
To copy widgets and layout from an existing Snowboard, select the Copy from existing Snowboard check box and then select which Snowboard to copy from the list.
Click Create.
Edit the Snowboard according to Edit current Snowboard.
Click Save.
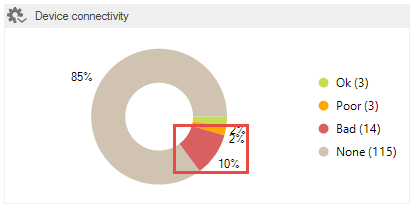
View data
To show the data that the widget is based on, click the specific representation of the data in the widget.
The widget Device connectivity shows that 14 devices, that is 10 %, of the devices, have Bad connectivity.
To show the devices with bad connectivity, click the red slice in the chart.
 |
Open Snowboard on secondary screen
The Snowboard is by default opened on the workspace. However, it is possible to open the Snowboard on a secondary screen:
To open the Snowboard on a secondary screen, click Open on secondary screen.
To pull back the Snowboard from the secondary screen to the workspace, click Pull back into manager.
To change your preferences on how the Snowboard is opened:
On the Preferences tab, select Start Snowboard on secondary screen.
The Secondary default view dialog box appears.
Select the view to be opened on the workspace when the Snowboard is opened on a secondary screen.
Click Apply.
On next startup of Snow Device Manager, the Snowboard will open on a secondary screen and the selected view will open on the workspace.
Note
The option Start Snowboard on secondary screen on the Preferences tab is only visible if there are more than one screen.