Configure the Citrix Hypervisor connector
The Snow Integration Connector for Citrix Hypervisor is configured in Snow Integration Manager (SIM). For more information on SIM, refer to Snow Integration Manager.
Prerequisites
A user account with the pre-established Citrix Hypervisor role Read Only assigned to it. To ensure proper matching with other sources such as the Snow Inventory Agents, it is recommended to match the VM names with their FQDN names.
Procedure
The Citrix Hypervisor connector uses an API connection.
Enter a Site name for this collection of Citrix Hypervisor servers.
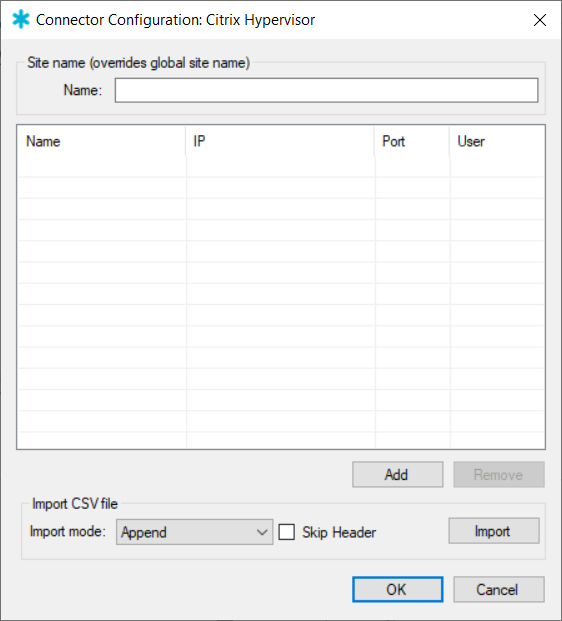
To add one or more Citrix Hypervisor servers to scan for virtual machines, select Add.
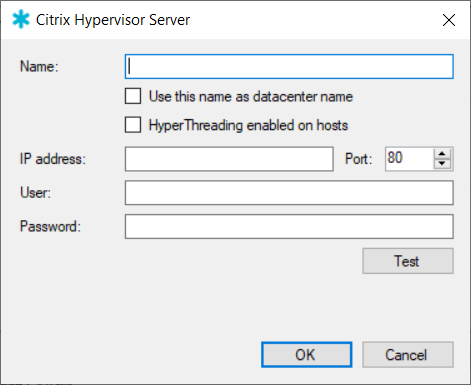
In the Citrix Hypervisor Server window, enter the Name of the server.
To use the typed name of the server instead of the default name, select Use this name as datacenter name.
To ensure that the correct processor core count is reported to Snow License Manager, select whether HyperThreading is enabled on the hosts.
To access the server, enter IP address, Port, User account, and Password.
Citrix Hypervisor uses port 80 by default, so use that port on a default installation.
To verify the connection, select Test.
To save settings and close the Citrix Hypervisor Serve window, select OK.
To save the settings, select OK.
To configure the Citrix Hypervisor connector for a scenario where the Pool Master is changed regularly; add all Citrix Hypervisor hosts, use the same Name for all hosts, and select the Use this name as datacenter name checkbox for all hosts.
When SIM goes through the list of hosts, it will only collect information from the current Pool Master.
Import Servers
The feature to import servers for the Citrix Hypervisor connector is introduced in Snow Integration Manager 5.17.
The Connector Configuration window displays the option in the Import CSV file component.
Select your preferred Import mode.
Note
Import modes are described in detail in Import options.
If you do not want to import the first line in the CSV file, select Skip Header.
Select Import.
Select a file with the
.csvextension.The list of servers that is displayed in Snow Integration Manager will be populated by servers from the CSV file.
Note
File format constraints are given in File format.
To save the changes and complete the import, select OK.
File format
To import servers, a CSV file must be used and contain the following columns:
Column name | Accepted value | Example |
|---|---|---|
Pool Name | text | Name of the pool 1 |
Pool name as datacenter name | Boolean (True or False) | True |
IP address | IP address | 10.12.124.23 |
Port | number | 8800 |
Username | text | admin |
Password | text | pass1 |
Hyperthreading enabled | Boolean (True or False) | False |
Rules:
The columns must be in the following order, with an example row beneath the header in the following table:
Pool Name
Pool name as datacenter name
IP address
Port
Username
Password
Hyperthreading enabled
Name of the pool 1
True
10.12.124.23
8800
admin
pass1
False
Enter only one server per line
Data fields must be separated by a comma
Values can be omitted in the CSV file, but commas must still be used.
Example row for a line where the IP address is omitted:
Name of the pool 1, True,,8800,admin, pass1, False
Commas can be used as values and must then be enclosed in double quotation marks. For example, a row where the password pass,1 is used:
Name of the pool 1, True, 10.12.124.23, 8800, admin, "pass,1", False
A double quotation mark can be used as value if another double quotation mark is written next to it and the entire value is enclosed in quotation marks. For example, a row where the password pass"1 is used:
Name of the pool 1, True, 10.12.124.23, 8800, admin, "pass""1", False
Note
If Microsoft Excel is used to produce a CSV file, the resulting file should contain double quotation marks and commas as per our rules.
Import options
There are two import options available: Skip Header and Import Mode.
If the Skip Header checkbox is selected, the first line of the CSV file is ignored. Use this option if the CSV file contains a header row with column names. Do not use this option if the CSV does not contain a header row.
Import Mode specifies how servers are imported in relation to servers that already exist in Snow Integration Manager. One of the three options can be selected:
Append: This option adds servers from the CSV file to the list of servers in Snow Integration Manager. Servers are not removed by use of this option.
Overwrite: This option removes all servers from Snow Integration Manager before adding servers from the CSV file.
Update: This option attempts to update the existing server list by matching existing servers with servers that are found in the CSV file. Servers are matched by the IP address field. If new servers are found in the CSV file, they will be added to the existing server list.
Servers are not removed by use of this option.
Note
When Update mode is used, pool names for servers must be unique.
Citrix Hypervisor Tools
The connector will be able to extract more information from virtual machines with Citrix Hypervisor Tools installed. Install Citrix Hypervisor Tools on all VMs to retrieve the maximum amount of information.
Hosts and virtual machines
If a VM is not running, it is not necessarily associated with any host. It is only when a VM is running that a host is defined. This means that a VM that is not running may in fact be associated with *no* host.
When the connector is trying to figure out which host a VM is associated with, the following logic is used:
If the VM is running, the host is known and we use that.
If the VM is not running, the host is inferred by the VM's affinity field (the preferred starting host).
If the host could not be inferred, the VM is ignored.
Citrix Hypervisor connector and SSL
Configure the connector to communicate over HTTPS by specifying port 443 in the server settings.
A default Citrix Hypervisor installation uses a self-signed certificate for TLS/SSL. The self-signed certificate needs to be installed manually on the server running Snow Integration Manager.
To make the connector work over HTTPS, either replace the default certificate with one from a trusted certificate authority or add Citrix Hypervisor's self-signed certificate to the client machine’s trusted certificate store. For information on how to replace Citrix Hypervisor's default certificate, refer to the Citrix Hypervisor documentation.