Configuration of LogMeIn GoToMeeting
The Snow Integration Connector for LogMeIn GoToMeeting is used for finding the following information about an organization's GoToMeeting account:
Monthly subscription cost
Number of active users (users that have organized a meeting in the last 30 days)
The configuration must be started and prepared according to SaaS connector configuration.
Prerequisites
A username and password of a LogMeIn account, with the role Administrator, is required to set up the connector.
Language and date formats in GoToMeeting
The GoToMeeting connector reports the meeting date (but not the meeting time) of the last activity. This meeting date is reported in the format that matches the language of the most recent user that has granted access. Navigate to the Edit profile section in GoToMeeting to change to another supported interface language.
The table shows date formats per language:
Language | Date format | Example |
|---|---|---|
Chinese, Simplified | yyyy'年'MM'月'dd'日' | 2018年06月28日 |
English, International | dd/MM/yyyy | 28/06/2018 |
English, US | MMM dd, yyyy | Jun 28, 2018 |
French | dd MMM yyyy | 28 juin 2018 |
German | dd.MM.yyyy | 28.06.2018 |
Italian | dd/MMM/yyyy | 28/giu/2018 |
Japanese | yyyy/MM/dd | 2018/06/28 |
Korean | yyyy M'월' dd | 2018 6월 28 |
Spanish | dd-MMM-yyyy | 28-jun-2018 |
Note
If the GoToMeeting interface language of the most recent user granting access is Brazilian Portuguese, the last activity date returned is not valid, due to a software bug in GoToMeeting:
In this case, AM/PM periods (tt) are returned instead of the year (yyyy), which is incorrect.
This is a known bug. As soon as the vendor fixes this, support for Brazilian Portuguese will be added to Snow Integration Manager.
Set up a GoToMeeting client
Snow Integration Manager integrates with GoToMeeting via an API.
Go to GoTo developer center and log in.
Open the OAuth clients page.
Select Create a new client.
Enter a client name of your own chosing, and a description (optional).
Enter http://localhost:8080 as the Redirect URI.
Select Next.
In the list of scopes, select Admin Center.
Select Save.
From the page that appears, copy Client ID and Client secret. They will be used in the configuration of the connector.
Select the I have stored the client secret checkbox.
Select Done.
The client is now created.
Configure the LogMeIn GoToMeeting connector
The LogMeIn GoToMeeting connector configuration fetches an OAuth access token, which provides the mechanism by which Snow Integration Manager becomes authorized to connect to GoToMeeting.
In the Configure section at the bottom of Connector Configuration: SaaS:
Enter into the respective boxes the GoToMeeting app character strings that you copied in Set up a GoToMeeting client.
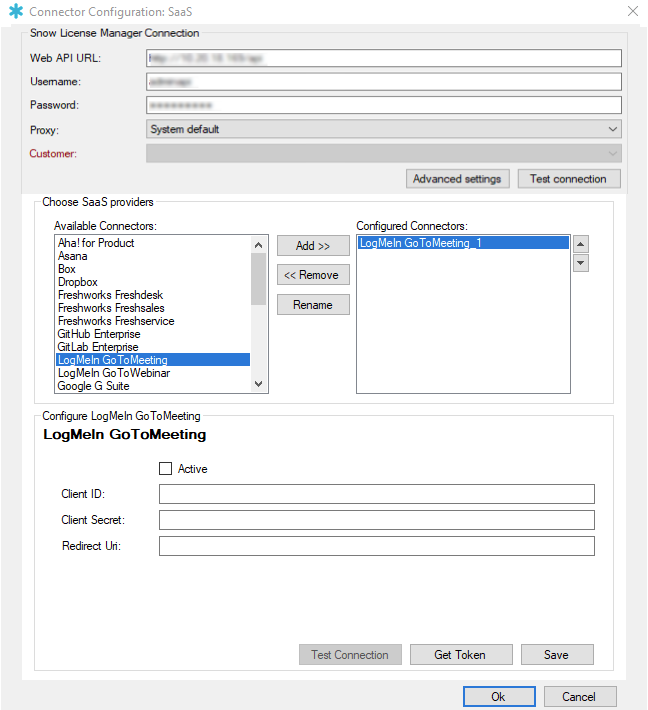
Enter the copied Client ID in Client ID, and Client secret in Client Secret, and the URL in Redirect Uri.
The next steps retrieve the OAuth access token.
Select Get Token. A web browser window appears.
Note
When Snow Integration Manager fetches the OAuth access token:
Some browser windows may open. Since this does not affect the authentication process, simply close them after the token is acquired.
A white window may display instead of the different windows of the authentication process. This means that the user is already logged in and has granted access to the application. A success message eventually displays.
Sign in with the username and password of a GoToMeeting account with the role Administrator.
Select Allow to grant the user access to the scopes defined.
Snow Integration Manager fetches the access token automatically, presenting the Success! dialog box once the process is complete. Select OK.
Back on the Connector Configuration: SaaS dialog box, select Test Connection.
If the connection is not successful, review the connection settings, fix any mistakes, and try again.
Once the connection is successful:
Select the Active checkbox.
Select Save to save this configuration.
After configuring the connection, you can aggregate data from it or schedule an aggregation.