Site name authentication
Site name authentication is only applicable to Snow Inventory agents, that is, for Snow Inventory 5 and later, and not for Snow Inventory clients, that is for Snow Inventory 3.7 and earlier versions.
By default, the Inventory server processes files (.snowpack and .inv files) from any site. However, by specifying a list of site names in the configuration file of the server it is possible to control which sites to process data from.
Apart from the site name, information on a so called "thumbprint" can also be specified; a secret shared between the agent and the server. In this case the thumbprint of an SSL certificate is used and needs to be distributed to all computers within the current site. The thumbprint is then included in the HTTP header of the incoming connection when the inventory file is sent to the server. If no thumbprint is specified, all inventory files from that site will be blocked.
Site names and thumbprints are specified in the SiteNameAuthenticationAllowList element of the server configuration file:
<Configuration>
  <Master>
    ...
    <Server>
      ...
      <SiteNameAuthenticationAllowList>
        <SiteName name="some-site*">
          <Thumbprint>84e182b124a21be8adf600c0411cca21db3973cb</Thumbprint>
        </SiteName>
        <SiteName name="other-site" />
      </SiteNameAuthenticationAllowList>
      ...
    </Server>
    ...
  </Master>
  ...
</Configuration>
The sitename authentication is turned ON if there is a SiteNameAuthenticationAllowList or a SiteNameAuthenticationDenyList in the server configuration file.
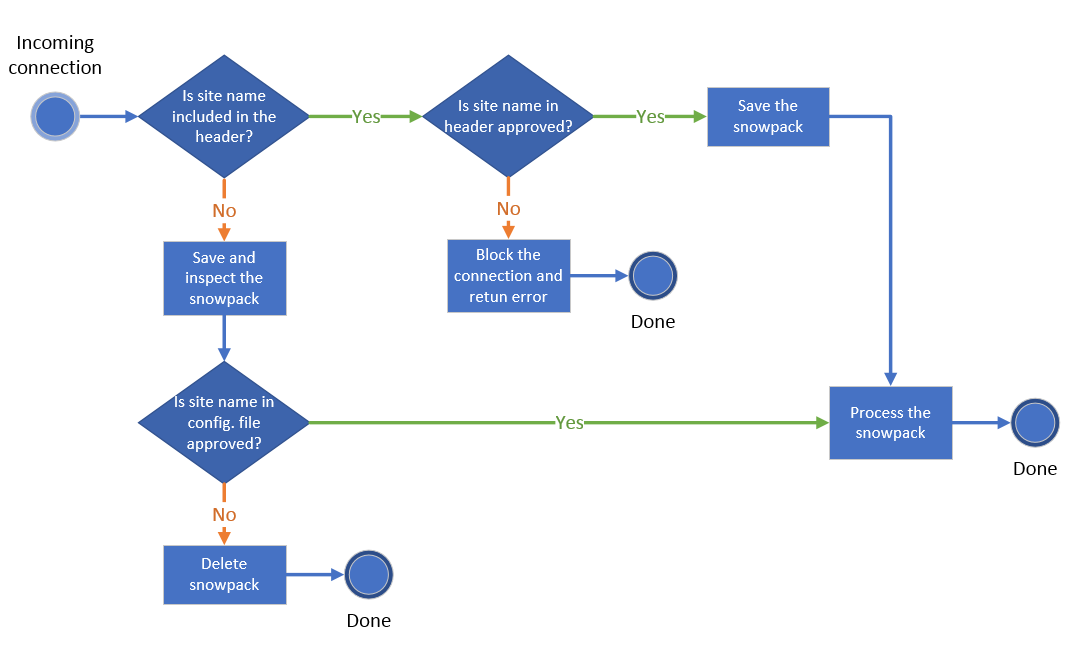
The control is carried out by checking both the site name and the thumbprint against the SiteNameAuthenticationAllowList and SiteNameAuthenticationDenyList elements. In the control, the site name is either approved or not according to the following definitions (also, see image):
Site name approved = Yes
The site name is listed in the server configuration file, and the thumbprint matches one of the specified site name-thumbprint pairs.
The site name is not listed in the server configuration file.
Site name approved = No
The site name is listed in the server configuration file:
but it does not match with one of the defined sitenames.
and it matches with one of the sitenames in the denylist.
The site name is included in the HTTP header of the incoming connection from the following agent versions (and higher versions):
Inventory Agent for Windows 5.1.1
Inventory Agent for Linux 5.1.0
Inventory Agent for Unix 5.0.4
Inventory Agent for macOS 5.2.0
For older versions of the Inventory agents, the site name is not included in the HTTP header. This means that the .snowpack file needs to be inspected in order to get information about the site name (see image).
The procedure for implementing site name authentication can be summarized as:
Decide what certificate to use. The thumbprint is shown in the properties of the certificate and can be copied from there.
Create a .pfx file containing the certificate (and the thumbprint).
List the site name and the corresponding thumbprint(s) in the SiteNameAuthenticationAllowList element of the server configuration file.
Distribute the .pfx file to the computers within the site. This is done as an agent update job in the Inventory Server Admin Console, where the .pfx file is included as a support file.
In this example, two thumbprints are specified for site MyCompany1 while no thumbprint is specified for site MyCompany2. Site MyCompany3 is not specified in the allow list.
<SiteNameAuthenticationAllowList>
  <SiteName name="MyCompany1">
    <Thumbprint>9C85010679CF10F8F04895914835BA06A4FB61AC</Thumbprint>
    <Thumbprint>156CE5D2A979267199550AF49A77DAA6BAF6DD7D</Thumbprint>
  </SiteName>
  <SiteName name="MyCompany2" />
</SiteNameAuthenticationAllowList>
The result of this configuration would be:
.snowpack files that have site name MyCompany1 will only be processed if they have a thumbprint that matches.
.snowpack files that have site name MyCompany2 will be processed.
.snowpack files with site name MyCompany3 will be blocked.
In this example, instead of a SiteNameAuthenticationAllowList you can have a SiteNameAuthenticationDenyList, but not both at the same time. The SiteNameAuthenticationAllowList takes precedence over the SiteNameAuthenticationDenyList.
<SiteNameAuthenticationDenyList>
  <SiteName name="some-site*"/>
  <SiteName name="another-site*"/>
  <SiteName name="*test*"/>
</SiteNameAuthenticationDenyList>
if the site name in an incoming .snowpack or .inv file matches one of the sites in the denylist, it will be blocked. While all other site names will be processed.
Instead of specifying each site name like:
<SiteNameAuthenticationAllowList>
  <SiteName name="Customer1" />
  <SiteName name="Customer2" />
  <SiteName name="Customer3" />
</SiteNameAuthenticationAllowList>
you can use wildcards, the * character in site names for both allow and deny lists:
<SiteNameAuthenticationAllowList>
  <SiteName name="Customer*"/>
</SiteNameAuthenticationAllowList>