Manage organization structure
For more information, see Organization structure.
In the category menu, expand Administration, and then click Organization.
Click New Node.
The New Organization Node dialog box appears with the tabs Organization, Auto Connect Rules, and Aliases. For information on the settings on these tabs, see the sections that follow.
When all settings have been made, click OK to save the new node and close the New Organization Node dialog box.
Organization tab
Select Parent Node in the list.
Note
There can only be one top level node.
Type an Organization Name and a Friendly Name of the organization node. The Friendly Name is the name that will be displayed in Snow License Manager. The Organization Name and the Friendly Name are often identical.
Note
It is not allowed to use apostrophes in organization names. If an apostrophe is used in an organization name, an error message will appear when the user tries to edit the organization node.
Optionally, type contact information of the Responsible person in the organization node.
When applicable, select the Legal organization node check box.
For most companies, only the top level of the company is a legal organization node. If the organization has multiple legal entities, multiple legal organization nodes can be created.
Auto Connect Rules tab
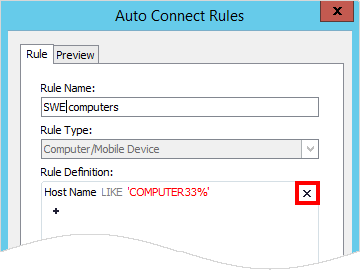
To create a new auto connect rule, click New.
The Auto Connect Rules dialog box appears with the tabs Rule and Preview.
On the Rule tab:
Type a Rule Name.
Select Rule Type in the list.
Note
Auto connect rules are applied in the following order after resetting all records to the ROOT of the Organization structure. Please take that into account when creating Auto Connect Rules to make sure you get the results that are required.
Computer/Mobile Device
User
Device
In the Rule Definition box, click + to add a new rule definition.
The Rule Definition dialog box appears.
Select Identifier in the list. Available items depend on the rule type selected in the previous step.
For rule type User the identifier According to used computer will automatically connect users to the same organization node that the computer he/she last used belongs to.
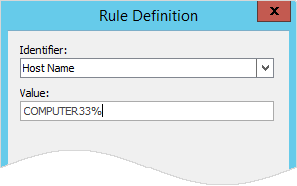
Type a Value for the Identifier.
Use % as a wildcard character to create more flexible rules.
Click OK to save the rule definition.
The new rule is listed in the Rule Definitions box.
On the Preview tab:
Click the Preview tab to see the result of the new rule.
The rule can be narrowed down by entering several rule definitions.
To remove a rule definition, click
 to the right of the definition.
Aliases tab
Organization node aliases are used when importing Microsoft License Statements (MLS).
To create a new alias, click New.
The Organization Alias dialog box appears.
Type an Alias name, and then click OK.
Note
The alias is case sensitive, meaning that if both “COMPANY INC.” and “Company Inc.” are included in the MLS file, two aliases have to be created.
In the category menu, expand Administration, and then click Organization.
Click the node in the Organization Structure list, and then click Edit Node.
The Edit Organization Node appears.
Make the changes and click OK to save.
In the category menu, expand Administration, and then click Organization.
Click the node in the Organization Structure list, and then click Delete Node.
Click OK to confirm the deletion.
The organization node and all its sub-nodes will be removed from the database.
An organization structure can be imported from an Excel file or from an Active Directory.
In the category menu, expand Administration, and then click Organization.
Click Import Organization Structure.
The Import Organization Structure dialog box appears with the tabs Import from Excel and Import from Active Directory.
Import from Excel tab
If the import source file has a column header, select the First row contains headers check box.
Click Open File, and then select the import source file.
A preview of the import is shown. Use the check boxes in the Select column to select the nodes to be added. Note that Select All and Clear All can be used.
Either the existing organization structure can be replaced, or the imported organization structure can be placed under an existing organization node. Use the Select parent node from existing organization list to select the parent node, or leave empty to replace the existing organization structure.
Click OK to import.
Import from Active directory tab
Type the Active Directory Domain, and then click Connect.
A preview of the import is shown. Use the check boxes in the Select column to select the nodes to be added. Note that Select All and Clear All can be used.
Click OK to import.
In the category menu, expand Administration, and then click Organization.
Click Export Organization Structure.
The Windows Save As dialog box appears.
Enter file name and location for the export file, and then click Save.
In this example, an auto connect rule is created that will automatically move all computers with a host name starting with SERVER to the organization node IT.
In the category menu, expand Administration, and then click Organization.
In the Organization Structure, click the IT node.
Click Edit Node.
The Edit Organization Node dialog box appears.
On the Auto Connect Rules tab, click New.
The Auto Connect Rules dialog box appears.
On the Rule tab:
Type a Rule Name.
In the Rule Type list, select Computer/Mobile device.
In the Rule Definition box, click +.
The Rule Definition dialog box appears.
In the Identifier list, select Host Name.
In the Value text box, type SERVER% where % is used as a wildcard character.
Click OK to save the rule definition.
On the Preview tab, verify that there are no conflicts.
Click OK to save the new auto connect rule.
Click OK to save the changes for the organization node.