Configure Snow License Manager
Enable federated authentication
This section describes how to enable support for federated authentication using SAML in your Snow License Manager environment.
User accounts for the domain users that will be granted permission to use Snow License Manager can be created in Snow Management and Configuration Center or be automatically created when Active Directory group integration is enabled. For more information on enabling Active Directory group integration, see Installation.
To create users in Snow Management and Configuration Center that will be granted permission in Snow License Manager:
Go to Start|All Programs|Snow Software|Snow License Manager|Snow Management and Configuration Center.
On the category menu, click Security.
Click New User.
The User dialog box appears.
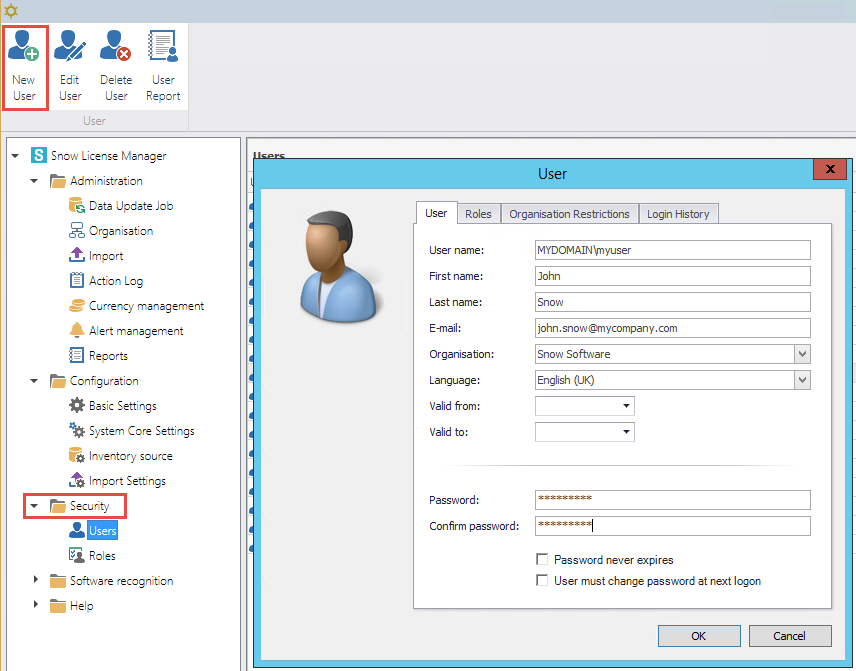
On the User tab:
Type User name as specified in the settings in the Identity Provider.
Default User name is the user’s email address.
Type First name, Last name, and E-mail.
Select Organisation and Language.
Type a Password.
Note
A password must be set, but it will never be used for authentication. The SAML component checks that the user exists, and handles the authentication.
On the Roles tab, select the appropriate roles for the new user.
Select the Password never expires check box
Click OK to save the new user.
Repeat the previous steps for every user that should be created.
The password reset functionality should be turned off, due to security reasons. To disable password reset:
Change the setting ENABLE_PASSWORD_RESET in Snow Management and Configuration Center to false.
The default path for the SAML configuration file is C:\Program Files\Snow Software\Snow License Manager\Web
For configuration file examples, see SAML configuration example.
To add the SAML configuration file:
Add an XML or JSON configuration file to the Web root folder for your Snow License Manager installation.
Verify that the name of the file corresponds to the value that has been specified in the SamlConfigFile key in the web.config.
The default path for the web config file is C:\Program Files\Snow Software\Snow License Manager\Web.
To update the web config file:
Add the following keys to the “Web.Config” file under the AppSettings> section in the Web folder for your Snow License Manager installation:
add key="UseFederatedAuthentication" value="True" />
UseFederatedAuthentication enables or disables the SAML authentication process.
add key="SamlConfigFile" value="snow.saml.config" />
SamlConfigFile should contain the name of the SAML configuration file to be used. The saml configuration file is expected to be located under the Web root folder.
Save the changes.
Restart the Snow License Manager IIS website.
Certificates
Most Identity Providers require a certificate to sign the requests between the Service Provider and the Identity Provider. The certificate can be read from either the certificate store in Windows or from a folder inside the Web root folder of Snow License Manager.
If you have PowerShell installed, you can use the New-SelfSignedCertificate cmdlet to create a self-signed certificate. For examples, see https://docs.microsoft.com/en-us/powershell/module/pki/new-selfsignedcertificate?view=windowsserver2022-ps
A certificate can also be created using the IIS manager. For more information on how to create and export a self-signed certificate, see https://docs.microsoft.com/en-us/iis/manage/configuring-security/how-to-set-up-ssl-on-iis#iis-manager
Note
The private key should be exported and configured in the SAML configuration.
Use the Certificate manager to import the certificate including the PFX file into the Windows certificate store.
Select the Local Machine as the store location and import it into the Personal certificate store.
Review the details and note the certificate’s serial number, thumbprint, and subject name.
Private key security: The Snow License Manager application will be accessing the certificate to be able to sign and decrypt the communication between the Service Provider and Identity Provider. To be able to do that, read the permission for the private key:
In the Certificate Manager, right click the certificate and select All Tasks, and then Manage Private Keys.
Assign Read permissions to the IIS_IUSRS group for the certificate.
Snow License Manager can also read the private key from a location on disk. Create a folder under the Web folder for Snow License Manager called Certificates and store the private key (pfx) file in the folder.
The certificate file can be configured to be read from either the certificate store or from a local folder.
Profile Name="ExampleIdentityProvider" LocalCertificateFile="Certificates\idp.pfx" LocalCertificatePassword="password"/>
The private key is identified by Serial Number. Note that thumbprint and subject name can also be used. For examples, see SAML configuration example.
Profile Name="ExampleIdentityProvider" LocalCertificateSerialNumber="5896b16b7fcc9c9d4ef3ca1a9b2653bb"/>
Endpoints
There are two different endpoints, SIGNIN and SIGNOUT, available in Snow License Manager that should be configured at the Identity Provider service. There is also an endpoint to export SAML metadata for the configuration file.
SIGNIN
The endpoint /federatedsecurity/saml/signin handles the single sign on (SSO). The SAML response from the Identity Provider that is sent back to the Snow License Manager site. The controller then asserts the security token and authenticates the user if the user has access to the Snow License Manager site.
https://webapp.contoso.com/federatedsecurity/saml/signin
SIGNOUT
The endpoint /federatedsecurity/saml/signout handles the single logout (SLO). When a logout request is sent from the Identity Provider, this controller receives the request and makes sure the user is signed out from the Snow License Manager site.
https://webapp.contoso.com/federatedsecurity/saml/signout
Export endpoint
The endpoint /federatedsecurity/saml/export exports an XML representation of the SAML metadata for the saml configuration file. This metadata can then be used to import the correct configuration into the Identity Provider. See SAML configuration example for a metadata export example.
https://webapp.contoso.com/federatedsecurity/saml/export
Force local logon
A user that navigates to the Snow License Manager web user interface will be redirected to the Identity Provider when the federated authentication setting is enabled. If you want to log in with a local user account, for example the default Administrator account a query string can be used.
By navigating directly to the login page with the query string “ForceLocalLogon” specified, the redirect is bypassed and you can log in with a local account.
https://localhost/Pages/Login.aspx?ForceLocalLogon=true