Manage Windows Store for Business
This chapter describes how to find, buy, and distribute applications to Windows 10 devices when using Windows Store for Business from Microsoft together with Snow Device Manager.
Prerequisites
To use Snow Device Manager to manage Windows Store applications, the following prerequisites must be fulfilled:
An Azure Active Directory Account must be available.
Users in Azure AD must have Premium Subscriptions (For O365, this is included).
Note
For automatic applications install to work, the end user must be logged on to Windows Store for Business with the same Azure AD user account as provided when assigning seats.
Initial steps
In addition to the prerequisites, the following steps need to be completed:
Create an Azure App (on-premises MDM Application) in Azure at https://manage.windowsazure.com/ with your MS Azure admin account to retrieve the following information:
Azure Application Client ID
Azure App Client key
Login Authority URL
Log in to Windows Store with an AD account and create a Business Store account at https://www.microsoft.com/business-store.
In Windows Store and on the Settings menu, click Management tools.
Identify the Azure app in the Tools list and click Active.
Integration with Windows Store for Business and your Azure AD is enabled.
Note
If the Azure app is not in the Tools list, click Add a management tool and search for the Azure app you want to integrate with.
Set up a Windows Store
On the Domain Admin tab, click Service management.
The Service management workbench appears.
Click Add and then select windowsstore.
A new applevpp service is created with a temporary name and the Windows Store for Business Service dialog box appears.
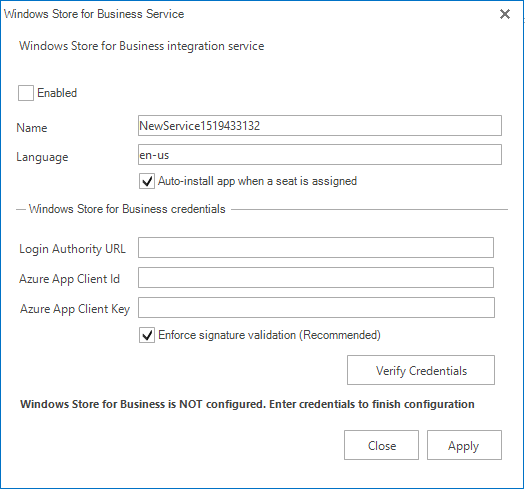
Enter the following information from the created Azure app:
Login Authority URL
Azure App Client ID
Azure App Client key
To activate enforced signature validation of all messages received from Azure, select the Enforce signature validation check box.
Click Verify Credentials and then click OK to close the dialog box that verifies the credentials.
Click Apply.
Click Save.
Add applications to the Windows store
Log in to Windows Store for Business with an Azure AD admin account.
Search for the application that you want to distribute.
Purchase the application.
The app is available for distribution from Snow Device Manager.
Assign a seat and install applications
On the View tab, click Applications and then click your Windows Store for Business service.
The Windows Store for Business service workbench appears.
On the Licensed Applications page, double click the application.
The Windows Store service appears.
On the Users page, select Add Users.
Search and select one or more users and then click Assign seat to users.
Click OK.
The application is installed on the user’s devices.
Note
For automatic application install to work, the end user must be logged on to Windows Store for Business with the same Azure AD user account as provided when assigning seats.
Applications that are free on Windows Store can be assigned to a user even if Available Seats equals 0.
The user may have multiple devices associated. Assigning a seat to the user will automatically install the app on all Windows 10 devices belonging to the user.
Revoke a seat and uninstall application
On the View tab, click Applications and then click your Windows Store for Business service.
The Windows Store for Business service workbench appears.
On the Licensed applications page, double click the application.
The Windows Store service appears.
On the Users page, select one or more users in the list.
Click Revoke seat from user(s).
The application is removed from the user’s devices.