Manage data import
To import a file, the column names of the import source file need to be mapped to the corresponding fields in Snow License Manager. If the import source file has no header, index mapping can be used instead.
Index mapping
If the import source file has no header, index mapping can be used. This means that the fields of the import source file will be identified by index (column position 0, 1, 2, etc.) instead of text (column header). Index mapping can be used for both import of new items and import of updated items.
Identifier mapping
In order for updated information to be mapped to the correct items, an identifier must be selected. Depending on how the import file looks like, select to identify by using the file header or to map by index.
File header:
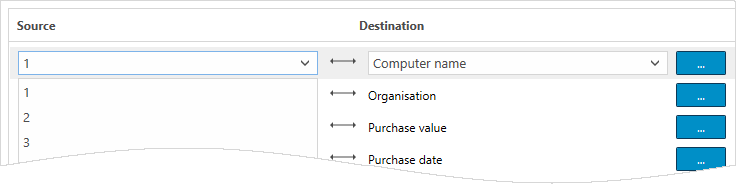
In the Field mappings view, use the lists to select which Source will be mapped to which Destination in SLM.
Map by index:
In the Field mappings view, use the Destination list to select identifier.
Then, use the Source list to select column position where information on the selected identifier is found.
Field mapping
The information in the import file needs to be mapped to the correct fields in the database. Depending on how the import file looks like, select to map using the file header or to map by index.
File header:
In the Field mappings view, use the lists to map the column headers of the import Source file to the corresponding Destination fields in Snow License Manager.
Map by index:
In the Field mappings view, use the Source list to select column position where information for each Destination field is found.
Field mapping options
Additional options can be set for the information in the import file:
Click
 on the row for the Source name.
The dialog box Field Mapping Options appears.
To remove any spaces in the beginning or the end of a data value, select the Trim leading or trailing white space check box.
In case the source field is empty, type a Default value to be imported instead.
Optionally, type a Prefix (text and/or number) to be added in front of all imported values. This can be used for separating items from different sites.
Example 82.When importing computer information, “SE_” can be added to the name of all computers located in site Sweden.
For update of existing items, the Empty value action is included for custom fields. In the Empty value action list, select how the system shall handle an empty custom field in the source file when updating the database. If a Default value has been defined, the Empty value action will not apply.
Action
Description
Do not update
The database will not be updated
Remove value
The database will be updated with the empty (blank) value
Click OK.
An exclamation mark
 to the right of the field name indicates that Field Mapping Options have been set.
In the category menu, expand Administration, and then click Import.
In the action menu, click the icon for the selected import or update.
Follow steps 1 to 5 below.
Step 1 - Upload a data source
In the Select a file to import box, click Browse to select the import source file.
If the first row in the import source file contains column headers, select the Has headers check box.
Click Next.
Step 2 - Import settings
Note
Available import settings depend on type of import.
In the New Organization action list, select how to handle organizations that exist in the import source file but not in the SLM database.
Action | Description |
|---|---|
Do nothing | Unknown organizations will be ignored. However, information on organization is required for a successful import. The field will be highlighted in the Preview step and it will not be possible to import data for that particular row. |
Create | The system will create the new organization node, either directly under the root (for example: ROOT/[new organization node]) or according to the path in the import source file (for example: ROOT/IT/[new organization node]). |
In the Identity mapping list, select which type of identity field that shall be used when mapping the license to the application.
In the Obsolete computer action list, select how to handle computers that exist in the SLM database but not in the import source file.
Action | Description |
|---|---|
Do nothing | Nothing will happen to the obsolete computers. |
Inactivate | All obsolete computers will be inactivated during the import. An inactive computer does not require licenses for its installed applications and is not included in the compliance calculations. |
Archive | All obsolete computers will be archived during the import. An archived computer is removed and all licenses currently attached to it are released. |
Delete | All obsolete computers will be deleted during the import. A deleted computer is removed from the system; all computer details are deleted and all attachments to users, agreements, licenses, etc. are released. |
A computer that has been archived or deleted during import cannot be restored. Only select Archive or Delete if you really want to remove them from the system.
Note
By a configuration setting, it is possible to limit the obsolete computer action to certain computers in the database, see Computer import tab.
In the Object type list, select the type of object to import. The available object types are the ones that have been created locally in the SLM Web UI.
Step 3 - Field mappings
Map the information in the import file to the corresponding fields in Snow License Manager. If the import source file has no header, index mapping can be used instead, see Identifier mapping and Field mapping.
For update imports, use the top row to select the identity field to be used when mapping the data in the import source file to the objects to be updated in Snow License Manager.
Map the rest of the column headers of the import Source file to the corresponding Destination fields in Snow License Manager.
Click Next.
Step 4 - Preview of import data
In the Preview step, errors like conflicts or invalid values are highlighted in red. Point to the field to see more information on the error.
It is possible to continue with the import/update even if there are invalid rows. However, only rows with no or yellow highlights will be imported. Rows highlighted in red will not be imported.
To correct any errors:
Use the Export buttons to export the information to an Excel file. An export can be of help when correcting the source file.
Click Back to go back and correct field mappings and import settings.
Click Next to start the import.
Step 5 - Importing data
The progress of the import is displayed.
When completed, click Finish to exit the data import wizard.
In the category menu, expand Administration, and then click Import.
In the action menu, click MLS Licenses.
Follow steps 1 to 5 below.
Step 1 - Upload an MLS document
In the Select a file to import box, click Browse to select the MLS file.
Click Next.
Step 2 - Import settings
Use the check boxes to link agreements and licenses to organization nodes. If the boxes are left cleared, all agreements and licenses will be linked to the root of the organization structure.
To allow for import of incomplete licenses, select the Import incomplete licenses check box.
Click Next.
Note
There has to be an alias, case sensitive, for each company name appearing in the Customer Name on Agreement column on the tab License Agreements of the MLS file.
Aliases are created when adding/editing an organization node.
Step 3 - Preview of agreements to import
The agreement preview allows for agreement data to be verified before it is imported. Errors are highlighted in red. Point to the highlighted field to see more information about the error.
To export the agreement preview to an Excel file:
Click All agreements or Discarded agreements to export the information to an Excel file.
Step 4 - Preview of licenses to import
The license preview allows for license data to be verified before it is imported. Errors are highlighted in red. Point to the highlighted field to see more information about the error.
If the basic setting ALLOW_INCOMPLETE_LICENSES is enabled,fields that are missing the required information are highlighted in yellow.
To export the license preview to an Excel file:
Click All licenses, Discarded licenses,or Incomplete licenses to export the information to an Excel file
It is possible to continue with the import even if there are highlighted fields. However, rows highlighted in red will not be imported. Rows highlighted in yellow will be imported, but the license will be marked as incomplete.
Click Next to start the import.
Step 5 - Saving data to database
The progress of the import is displayed. When the import is completed, the licenses and agreements can be exported to an Excel file.
Click Finish to exit the MLS import wizard.
Start the Web Configurator tool, and then click the Import Service tab.
Settings
To change the default Import Root folder (created during the installation of SLM), click  and then select the new path.
If the selected folder is not empty, all included folders and files will be deleted. The folders Import, ErrorRows, and Backup are automatically created in the new folder. If sub-folders are added to the Import Folder, see Import Folders, these sub-folders are automatically replicated to the folders ErrorRows and Backup.
To define for how long the system should wait before cancelling an import, use the File Transfer Wait Limit (minutes) list. Default value is 60 minutes.
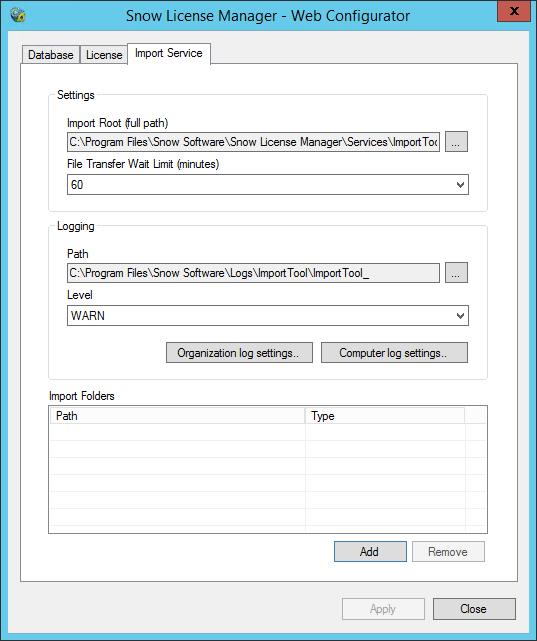 |
Logging
Use the Level list to select log level:
Log level | Description |
|---|---|
ALL | Shows all logged information. |
DEBUG | Detailed information mainly intended for internal use. |
INFO | Shows all the steps taken in the process. |
WARN | Something is wrong but, but the performance of the system is not affected. |
ERROR | Something has stopped working, but the system is still up and running, and can be used. |
FATAL | The system has stopped working. |
Note
The ALL log level shows information from the levels debug, info, warn, error, and fatal. The DEBUG log level shows information from the levels info, warn, error, and fatal, and so on.
Organization log settings
If a new organization is created during an import, the created organization nodes can be logged to a separate file. Whether new organizations should be created is defined by the Create missing organizations option, see Import Folders.
To enable logging and define settings for this log, click Organization log settings.
The Organization Log dialog box appears.
Select the Enable check box.
Click
, and then select the folder Path where the log file should be saved.Select Max File Size (MB) in the list. Rows are appended to the log file until the specified maximum file size is reached, at which point the file is backed-up and a new log file is created.
In the Backup Count list, select number of files to keep.
Optionally, select the Include date stamp check box.
Click OK to save the settings and close the Organization Log dialog box.
Computer log settings
When importing computer data, actions taken for obsolete computers (computers that exist in the SLM database but not in the import file) can be logged to a separate file. If the setting Obsolete computer action is set to DoNothing, it will not be logged.
To enable logging and define settings for this log, click Computer log settings.
The Computer Log dialog box appears.
Select the Enable check box.
Click
, and then select the folder Path where the log file should be saved.Select Max File Size (MB) in the list. Rows are appended to the log file until the specified maximum file size is reached, at which point the file is backed-up and a new log file is created.
In the Backup Count list, select number of files to keep.
Optionally, select the Include date stamp check box.
Click OK to save the settings and close the Computer Log dialog box.
Import Folders
The Import Folders section shows the existing import folders, identified by Path and import Type.
To add an import folder, click Add.
The Import Folder dialog box appears with the two tabs Configuration and Field Mapping.
Configuration tab
Note
For import of files from Snow Optimizer for SAP Software, select SAP in the Type list. Only Subfolder (optional), Customer, and Import File Backup can be set for this type of import.
In the Import Settings section:
Optionally, type a Subfolder under the default import root to import files from.
For SPE platforms, select Customer in the list.
Select Type of import in the list.
In the Additional Import Settings section:
For computer imports, select Obsolete computer action in the list.
To restrict the obsolete computer action to certain computers in the database, type the client configuration names in the Configuration names text box.
For more information, see Computer import tab.
For license imports, use the Primary key mapping list to select type of identity field to be used when mapping the license to the application.
For license assignment imports, select Assignment action in the list.
For object imports, select Object type in the list. Available types are the ones that have been created locally in the SLM Web UI.
For import of custom compare value types, select Custom Compare Value Type in the list. Available types are the ones that have been created locally in the SLM Web UI. Also, in the Primary key mapping list, select type of identity field to be used when mapping the type.
In the Import File section:
If the import files have headers, select the Has headers check box.
Otherwise, the option Map by index can be used on the Field Mapping tab, see below.
Select Type of import file in the list.
Select the type of Delimiter that is used between the data fields in the import files.
In the Import File Backup section:
To enable Import File Backup, select the Enable check box.
Specify the number of Days to keep the files.
Specify the number of backup files to keep in the File count list.
In the Organization section:
Type the Separator that is used in the import files between the levels of the organization structure. For example, enter “/” if the organization information is in the format: “ROOT/IT/Support”.
To allow the import to create organizations that exist in the file, but not in the SLM database, select the Create missing organizations check box.
If capital letters should be used in the friendly name of the organization, for example FINANCE, select the Use upper case for friendly names check box.
Field Mapping tab
The Mappings list shows all target fields for the selected type of import.
To manually define mapping of a target field to a field in the import source file, double-click the corresponding row. The Mapping dialog box appears.
In the Source text box, type the header name or index (column position 0, 1, 2, etc.) of the field in the import file.
To enable index mapping, select the Map by index check box.
Type a Default value to be imported if there is no value in the source field.
For updates of existing items in the database, use the Empty value action setting to define how the system shall handle an empty field in the source file:
Do not update - no change in the database
Remove value - the value in the database will be empty after the update
If a Default value has been specified, there will be no empty fields and the Empty value action will not apply.
Type a Prefix (text and/or number) to be added in front of all imported values. This can be used to separate computers from different sites, for example SE_ can be added in front of all computers located in Sweden.
To remove any spaces in the beginning or end of a data value, select the Trim leading / trailing white spaces check box.
Click OK to save the settings and close the Mapping dialog box.
To automatically define mapping based on an existing import file, click Auto map from file. You will be prompted to select a file, which should represent the contents of the future import files of the selected import type. The Mappings list will display the automatic mapping. Manually add the mappings that are missing or incorrect.
Rows that for some reason cannot be imported will be logged in the folder ErrorRows. Based on the logged file contents, you may have to correct the field mappings or import settings.
In this example, the import file is an Excel file with column headers.
In the category menu, expand Administration, and then click Import.
Click Licenses.
In the Select a file to import section, click Browse to select the import source file.
Select the Has headers check box.
Click Next.
In the New Organization action list, select Do nothing.
In the Identity mapping list, select Application Name.
Click Next.
For each field, verify that the pre-selected mapping of Source and Destination fields is correct. If not, use the lists to select the appropriate column header in the source file.
Click Next.
If there are errors in the preview, click Back and correct the field mappings, or click Cancel to correct any erroneous values in the import file.
Click Next.
The progress of the import is displayed.
When the import is completed, click Finish.
In this example, the import file is .csv file with column headers.
Start the Web Configurator.
Click the Import Service tab.
Click Add.
The Import Folder dialog box appears.
Select settings on the Configuration and Field mapping tabs, see below.
When saved, the new folder appears in the Import Folders section.
Click Apply to save the new import folder configuration.
Click Close to close the Web Configurator.
Configuration tab
Optionally, type a Subfolder under the default import root, for example License.
Select License in the Type list.
Select Name in the Primary key mapping list.
Select the Has headers check box.
Select Csv in the Type list.
Select Comma in the Delimiter list.
Field Mapping tab
Click Auto map from file.
Select the import file.
For each field, verify that the automatic mapping displayed in the Mappings list is correct. If not, do the following:
Double-click the row with the incorrect mapping
In the Mapping window, type the appropriate Source file header
Click OK
When the mapping is complete, click OK.