Add Multi-Cloud Services to the Catalog
With multi-cloud templates, you can create a single service that can be deployed on multiple datacenters, as well as multiple private, public, or hybrid clouds.
Here are some examples of services that you can publish using multi-cloud templates:
- a service that can be deployed on vCenter, SCVMM, AWS, or Azure
- a service that can be deployed on multiple vCenters
You can also use multi-cloud templates to make it easier to keep the service catalog up to date. Create a multi-cloud template that contains a single base OS template, such as CentOS, and then create multiple published services that point to this multi-cloud template. Use completion workflows or configuration management tools (such as Chef or Puppet) to install custom software on the deployed VMs. When it's time to update the template, you only have to edit the multi-cloud template; all published services pointing to this template will automatically be updated.
Depending on your environment, you can create multi-cloud services in different ways. For example, if you want to create a three-tier service, you could:
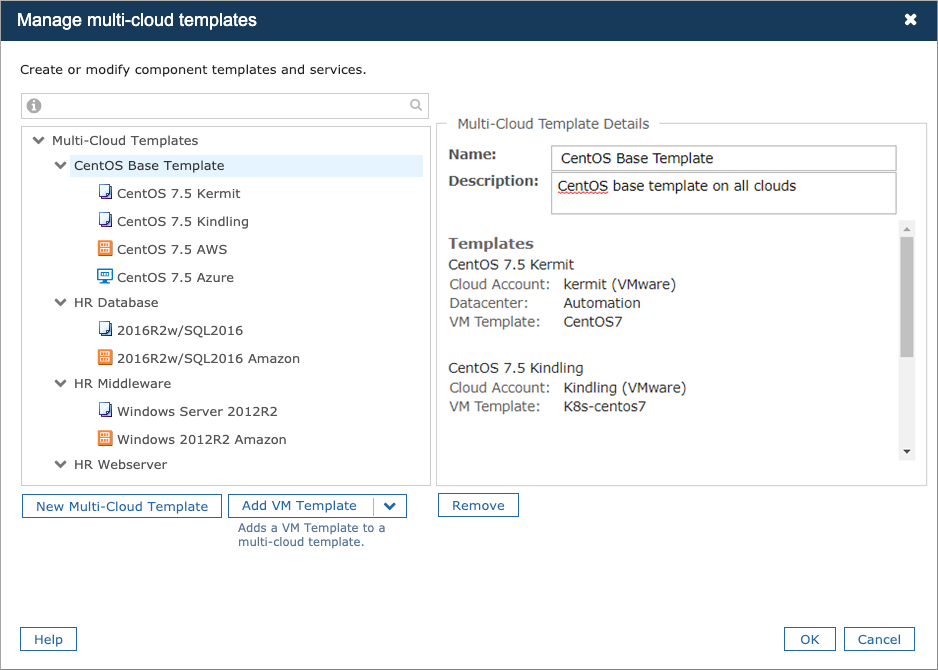
- Create three multi-cloud templates, one for each tier, as shown in the image above
- Create two multi-cloud templates: one for the database, and one for both the web server and middleware tiers. The web server and middleware tiers could then be configured using Chef, Puppet, or a configuration spec.
Publishing a multi-cloud service involves two steps:
- Create multi-cloud templates
- Add multi-cloud services to the catalog
You can create multi-cloud services from existing services. See Create Multi-Cloud Service Catalogs from Existing Services.
Limitations:
- The details of a multi-cloud catalog entry don't include information about its source multi-cloud templates.
- Multi-cloud services aren't yet supported for Google Cloud Platform.
- You can't add any of the following to a multi-cloud template: CloudFormation templates, ARM templates, virtual service templates, OVA templates, or OVF templates.
Create multi-cloud templates
Access: | Configuration > Self-Service |
Available to: | Commander Roles of Superuser and Enterprise Admin |
- Click the Catalog tab.
- On the Catalog page, click Multi-Cloud > Manage multi-cloud templates.
- In the Manage Multi-Cloud Templates dialog, click New Multi-Cloud Template.
- Provide a name for the template, and an optional description. For example, if you're creating a multi-cloud template for Windows 2012 , use the name "Windows 2012".
- To add a private template:
- Click Add VM Template and choose VM Template, Image or AMI.
- In the Available Templates and VMs dialog, navigate to the first VM template you want to add to the list, select it, customize the name if you wish, and click Add to Multi-Cloud Template.
- Click Close to close the Available VMs and Templates dialog.
Use the Quick Search to locate VM templates.
- To add an AMI from the Amazon Marketplace:
- Click Add and choose Amazon Marketplace AMI.
The Add Amazon Marketplace AMI dialog displays a list of Marketplace AMIs, sorted by name.
If you very recently installed Commander or added an AWS account as a cloud account, you may have to wait a few minutes for the list to be populated.
- If necessary, use the Show drop-down list to change the scope of the list.
- Favorites: Displays a list of favorite AMIs. Only the latest version of each AMI is available in the favorites list. You can customize the favorite AMIs list.
- Marketplace (latest version): Display only the latest version of each AMI.
- Marketplace (all): Display all Marketplace AMIs.
- If necessary, filter your search by:
- entering text in the search field. The search is based on the AWS properties Name, Description and ID
- making a selection from the Platform drop-down list
If Commander is unable to determine the platform for an AMI from the AWS API, the Platform is displayed as Unknown.
When you select an AMI, its details are displayed in the Details section to the right. The ID property isn't shown in Commander. The Regions property shows whether an AMI can be deployed to all regions, or only to a subset.
- Select an AMI from the list.
- Click View AMI details on AWS Marketplace to verify that you have subscribed to the correct AMI.
Important: If you have not subscribed, service deployment will fail.
- Optional: Use the Name field to customize the display name for this component in the Service Catalog.
This is the component name that a user sees when completing a service request form.
- Click Add to Multi-Cloud Template.
Because Amazon Marketplace AMIs are typically deployable in all regions, once you've added an Amazon Marketplace AMI to a multi-cloud template, you can't add another Marketplace AMI, or a non-Marketplace AMI. The Regions property in the Details section of the Add Amazon Marketplace AMI dialog shows whether an AMI can be deployed to all regions, or only a subset.
- Add a VM template from each location where you want this multi-cloud template to be deployed.
In our example, we've added a Windows 2012 VM template from our vCenter and AWS cloud accounts. For public clouds, make sure to add an image from each region where you want to be able to deploy this service.
Once you've added a VM template, the list is automatically filtered to show only compatible items. The following rules are used:
- You can add only one VM template from each VMware datacenter.
- You can add only one VM template from each public cloud region.
- You can add only one VM template from each SCVMM cloud account.
- All VM templates of the same cloud account type must have the same number of disks and network adapters. For example, all VMware VM templates in a multi-cloud template must have the same number of disks and templates.
- Click OK to close the Configure Multi-Cloud Templates dialog.
Add multi-cloud services to the catalog
Access: | Configuration > Self-Service > Catalog tab |
Available to: | Commander Roles of Superuser and Enterprise Admin |
- On the Catalog tab, click Add Service.
- On the Service Description page, enter a Name to be displayed for the service in the Service Catalog.
This name is used as the label for the Service section of the Request New Service form. Choose a distinctive Service Name to help requesters fill out the form.
- Optional: Enter a Description for this service.
Along with the Name field, the Description field is used in Service Catalog searches, so adding a description can help users find service catalog entries.
- Choose an Icon from those available. To add an icon, click Manage Icons. See Manage icons for the service catalog for more details.
- To help users find this service in a long list, choose one or more Categories from those available. To add a category, click Manage Categories. See Manage Service Catalog categories for more details.
If the service-level form elements such as Quantity and Expiry Date don't make sense for this service, you can hide the service portion of the service request form by clearing the Display service form when this service is requested checkbox.
- On the Component Blueprints page, click Add > Multi-Cloud Template.
- In the Add Multi-Cloud Template dialog, select a multi-cloud template and click Add to Service.
- Add more multi-cloud templates or custom components to the service if desired.
All multi-cloud templates added to a service must share at least one VM template location. For example, let's say one multi-cloud template includes a base OS template that can be deployed only on-premises. You could add another multi-cloud template that includes a base OS template that can be deployed to any of your cloud accounts.
- Click Close.
The multi-cloud templates you added appear on the Component Blueprints page.
A component blueprint page appears in the wizard for each multi-cloud template you added. Each component blueprint page contains at least four tabs: Infrastructure, Resources, Attributes and Form. See the following sections for details on each option.
Infrastructure tab
If your multi-cloud template includes templates from multiple cloud types (for example, AWS and VMware), you will see cloud-independent settings at the top of the Infrastructure tab, and cloud-specific settings at the bottom of the Infrastructure tab.
Global Infrastructure settingsField | Description |
|---|
Name | The name that will be displayed for the component in the Service Catalog and as the label for the Component section of the Request New Service form. A user sees the component name when viewing service details and when completing a service request form. Choose a distinctive component name to help requesters fill out the form. |
Description | Optional: Customize the description for this component that will appear in the Service Catalog. A user sees the component description when viewing service details and when completing a service request form. |
Deployed Name | Specify the name for deployed instances of this component. Select Use default naming format to use the default naming convention, or specify a customized deployed name. Click Configure global text replacement rules to shorten your component names. See also Set up text replacement rules for service names. |
Completion Workflow | Specify a component-level completion workflow that will be run for all of the VM templates in the multi-cloud template. Completion workflows allow you to specify actions to be carried out after deployment. If you have set up one or more component-level completion workflows, you can select one from the drop-down. You can click Add Workflow to create a new workflow. You can click Edit Workflow to edit the workflow that's currently selected in the drop-down list. Note that when you edit the workflow using this link, you're editing the workflow for all of the components or services it's assigned to. While it's possible to create completion workflows for all component types, they are especially recommended for all custom components. If no completion workflow is assigned, a custom component moves immediately to the Completed state once approved, but a completion workflow allows provisioning steps to be carried out before the component moves to Completed. The completion workflow for a database instance, for example, could include a script to create the database. |
VMware Infrastructure settingsField | Description |
|---|
Customization Spec
(Windows and Linux templates only) | Customization specs allow Commander to modify source images during deployment, greatly reducing the number of templates you must maintain to deliver a variety of services based on the same OS. If the component is a Windows or Linux template with a customization specification, you can select a different specification for the template by selecting one from the drop-down menu. The drop-down list displays only those customization specs that currently exist on every location supported by this multi-cloud template. You can manually enter a name and create the customization spec later. You can also assign a customization spec through a completion workflow with a Customize VM step. To avoid collisions, choose only one of these methods. The specified customization spec must exist on all target locations at deployment time. If the Dynamic Resource Scheduling (DRS) automation level for a cluster is set to Fully automated and VM-level DRS control is allowed, Commander temporarily disables DRS during guest OS customization for new VMs deployed into the cluster. Disabling DRS means that vSphere won't migrate a newly provisioned VM before customization is complete. A Commander event is generated when DRS is disabled, and again when it's re-enabled. |
Deployed VMs will be | Choose Linked Clones to deploy the VM component as a linked clone. Otherwise, choose Standalone VMs. A linked clone is created from the most recent snapshot of the parent. Because the linked clone relies heavily on the parent snapshot, the parent or snapshot location should be on a very fast SAN (SSD), especially if multiple linked clones are created from the same parent. The linked clone consists of the snapshot plus the metadata and the delta between the snapshot and the deployed image.
Commander always uses the most recent snapshot to create the linked clone. If the component is a template without a snapshot, you can't select Linked Clones. You must first convert the template to a VM, create a snapshot, and then convert the VM back to a template. If the component is a VM without a snapshot, Commander creates a snapshot during deployment. |
AWS Infrastructure settingsField | Description |
|---|
User Data
(VM templates only) | Enter user data to customize this VM during provisioning. See AWS User Data Syntax and Supported Variables for more information. |
Additional Annual Cost
(Amazon Marketplace AMIs only) | Some Marketplace AMIs have costs in addition to instance type costs. Enter an amount to represent the estimated additional annual cost of this Marketplace AMI. This field allows you to display an accurate service cost to requesters. Use the View AMI details on AWS Marketplace hyperlink to get pricing information for this AMI. The value you enter will be set for the Additional Costs custom attribute for VMs deployed from this service. The AWS cost calculator provides an hourly cost, while Commander requires an annual cost. |
IAM Role
(VM templates only) | Optional: Enter an AWS IAM role for this component. Important: Commander doesn't validate IAM role names, so ensure that role names entered in Commander match those in AWS. IAM role names are not case-sensitive. The IAM role you specify must exist on every location supported by this multi-cloud template. Using variable substitution, you can assign the IAM role based on information from the request process. Both custom attributes and Input Text Fields are supported as variables. For example, on the Attributes tab of the blueprint, you can create a custom attribute called IAM Role. On the Form tab of the blueprint, you can add the IAM Role custom attribute form element. Then, back on the Infrastructure tab, you can click in the IAM Role field to select variables. Select the IAM Role custom attribute: #{target.settings.customAttribute['IAM Role']}. You can assign an IAM role to the deployment destination rather than the catalog blueprint, if you deploy the same template (AMI) to multiple deployment destinations, or if you have a large number of catalog entries. If an IAM role is configured in both the deployment destination and the blueprint, the blueprint takes precedence. Administrators can override the IAM role during manual deployment. |
Monitor Memory Usage
(VM templates only) | To enable memory usage monitoring, enable the option Send guest OS memory usage statistics to Amazon CloudWatch. Memory usage monitoring requires the VM to have credentials with full access to CloudWatch. You can enter a role in the IAM Role field for this purpose. For more information, see Monitoring Memory Metrics for Amazon EC2 Linux Instances and Monitoring Memory Metrics for Amazon EC2 Windows Instances. |
Azure Infrastructure settingsField | Description |
|---|
Availability Set
(Azure VM images only) | Enter an availability set name. Microsoft Azure availability sets ensure both fault tolerance and service availability. If the availability set you specify doesn't exist in the target location, it will be created. Availability set names are case-insensitive, must contain from 1 to 80 characters, and may contain letters, numbers, underscores and hyphens. |
Monitor Memory Usage
(VM templates only) | To enable memory usage monitoring, enable the option Send guest OS memory usage statistics to a storage account. Memory usage monitoring requires additional configuration, such as specifying a diagnostic account on the deployment destination where the VM will be deployed. For more information, see Monitor Memory Metrics for Azure Instances. |
Resources tab
If your multi-cloud template includes templates from multiple cloud types (for example, AWS and VMware), you will see a section for each cloud in the Resources tab.
VMware and SCVMM Resource settingsField | Description |
|---|
CPU Count
(VMs and templates only) | Set the default number of CPUs for this specific component. |
Memory
(VMs and templates only) | Set the default memory requirements for this specific component. |
Disks
(VMs and templates only) | Set the default storage requirements for this specific component. For existing disks, or disks that you add, you can change the disk size and storage tier. Enable the Locked option to stop Service Portal users from modifying a hard disk in a service request. The disk format is taken either from the source template or from the provisioning destination. The settings in the provisioning destination override the template settings, so if you want to use the template settings, make sure to select Same format as source on the Disk Format page of the Automated Deployment Placement wizard. You must ensure that datastores are available to back all storage tiers in use. It's not possible to: resize IDE disks, delete the base disk, or decrease the base disk size. |
Network
(VMs and templates only) | Set the default networking information for this specific component. Select a network zone for each adapter from the drop-down menu. Add adapters by clicking the Add Adapter link, and then set the required network zone. - The network zone and storage tier set for a requested service are used to determine the provisioning destination, which in turn affects costs displayed for the published service.
- If you're using network zones, to prevent automated deployment failure, you must either configure a default network zone on the Resources tab, add the Network element to the Form tab, or both.
- If a network zone assigned to a service catalog component is deleted, the service is marked as corrupt and can't be requested.
- If you don't add the Storage element and/or the Network element to the Form tab, the default values configured on the Resources tab are used to determine placement, which defines what destinations appear on the Service form. For more information, see Service Request Form Elements.
|
AWS Resource settingsField | Description |
|---|
Instance Type | Set the default instance type for this specific component. Only instance types compatible with the source AMI's instance type are available for selection. If multiple AMIs are added to the multi-cloud template, only instance types that are common to all regions are available for selection.
Click Details to view more properties for the selected instance type. |
EBS Optimized | Specify whether this instance type will be EBS optimized by default, if the selected instance type supports it. EBS optimization enables additional, dedicated throughput between Amazon EC2 and Amazon EBS, and therefore improved performance for Amazon EBS volumes. Additional charges from AWS apply if you enable this option. |
Key Pair | Assign a key pair to the instance. A key pair can be used to open an SSH session to a Linux or Solaris instance from Commander and the Service Portal. See Enable Key Pair SSH Connections to Amazon EC2 VMs to learn how to set this up. You can choose one of the following key pair assignments for the instance: - an existing key pair from the region
- Let System Decide: With this option, Commander automatically chooses the key pair to assign to the VM. It will choose one of the following, in the order of precedence listed below:
- a key pair that matches a key pair credential associated with the requester
- a key pair that matches a key pair credential associated with the requester's organization
- a key pair assigned to the deployment destination
|
Disks | Set the default storage requirements for this specific component. The following are not supported:
- deleting the base disk
- decreasing the capacity of the base disk
- changing the encryption setting for existing disks
- adding network adapters
To add a disk, click Add Disk. To delete a disk, click . For each disk, you can specify the following:
Device Name: Specify the name that the block device driver for the instance will assign when mounting the volume. The name recommended by Amazon is provided; edit this value if required. Fore more information, see Block Device Mapping in the AWS documentation. Capacity: Specify the disk capacity, in GB. Volume Type: Select one of the following types from the drop-down menu. Hover over the icon for details on each type. Fore more information, see Amazon EBS Volume Types in the AWS documentation. - General Purpose (SSD): General purpose Solid-State Drive volume that balances price and performance for a wide variety of transactional workloads. Recommended for system boot volumes, virtual desktops, low-latency interactive apps, development and test environments.
- Provisioned IOPS (SSD): Highest-performance SSD volume designed for mission-critical applications. Best for critical business applications that require sustained IOPS performance, or more than 10,000 IOPS or 160 MiB/s of throughput per volume, such as large database workloads and EBS-optimized instances. The ratio of IOPS provisioned and the volume size requested can be a maximum of 50.
- Magnetic: Previous-generation Hard Disk Drive volumes for workloads where data is infrequently accessed. Not recommended for new applications.
- Throughput Optimized (HDD): Low-cost Hard Disk Drive volume designed for frequently accessed, throughput-intensive workloads. Best for streaming workloads requiring consistent, fast throughput at a low price, such as big data, data warehouses, and log processing. The minimum disk size for this type is 500 GB. Can't be a boot volume.
- Cold (HDD): Lowest-cost Hard Disk Drive volume designed for less frequently accessed workloads. Best for throughput-oriented storage for large amounts of data that's infrequently accessed. The minimum disk size for this type is 500 GB. Can't be a boot volume.
IOPS: If you select the Provisioned IOPS (SSD) volume type, you must specify the number of I/O operations per second (IOPS) this volume will support. Specify a number between 100 and 10,000. A maximum ratio of 50:1 is permitted between IOPS and volume size; for example, a volume with 3000 IOPS must be at least 60 GB in size. The minimum disk size for this storage type is 4 GB. Encryption: Specify whether to encrypt the disk. Note that not all instance types support disk encryption; see Amazon EBS Encryption in the AWS documentation for the list of supported instance types. Delete on Termination: By default, this disk will be deleted when the VM to which it's attached is terminated. If you want to preserve this disk so that it can be attached to a different VM when this VM is terminated, disable this option. The new disk is created in the same availability zone as the instance it's attached to. You can enable the Locked option to stop Service Portal users from modifying a hard disk in a service request. |
Subnet | Select a network zone for each adapter from the drop-down menu. If you don't specify a network zone, a network zone is assigned based on the target deployment destination. The component will be deployed with the same number of adapters as the source AMI. For more information on network zones, see Assign Network Zones. If a network zone assigned to a service catalog component is deleted, the service is marked as corrupt and can't be requested. |
Azure Resource SettingsField | Description |
|---|
Instance Type | Set the default instance type for this specific component. Only instance types compatible with the source image's instance type are available for selection. If multiple images are added to the multi-cloud template, only instance types that are common to all regions are available for selection. Click Details to view more properties for the selected instance type. |
Storage | Set the default storage resources for this service. Select Managed Storage or Unmanaged Storage, as required. Edit the suggested device name if required. Managed disk names must be unique in the target resource group. Unmanaged disk names must be unique within the VM. The name must contain from 1 to 64 characters, must contain only letters, numbers, hyphens, dots and underscores, and must start with a letter or number. Limitation: Even though you can edit the name for a managed disk, the suggested name will be used. Specify the disk capacity in GB. Note that you can't shrink existing disks, and you can't resize existing unmanaged disks. If you selected Unmanaged Storage for the Storage Type, choose a storage tier from the drop-down list. If you selected Managed Storage for the Storage Type, select one of the following types from the drop-down list: - SSD: Premium disks (SSD) are backed by solid-state drives and offer consistent, low-latency performance. They provide the best balance between price and performance, and are ideal for I/O-intensive applications and production workloads. Premium disks are not supported for all instance types.
- HDD: Standard disks (HDD) are backed by magnetic drives and are preferable for applications where data is accessed infrequently.
Each Azure instance type has limitations for the number and type of disks that can be added. |
Subnet | Set the default network zone for this component's adapters. The component will be deployed with the same number of adapters as the source AMI. If you don't specify a network zone, a network zone is assigned during provisioning. If a network zone assigned to a service catalog component is deleted, the service is marked as corrupt and can't be requested. |
Allocation Method | Specify whether this service will have a public IP address. By default, Create Public IP Address is selected. You can select either Static or Dynamic from the drop-down menu. If you don't want a public IP address to be assigned, select No Public IP Address. |
Credentials | If this is a Generalized (or prepared) Azure template, you can select credentials that will allow users to access VMs deployed from this service. Generalized templates contain no built-in authentication information, as opposed to Specialized templates, which have preconfigured credentials. - The use of Generalized templates is highly recommended by Microsoft.
- If credentials are not supplied for a generalized template, either on this tab or on the Form tab, credentials must be specified during manual deployment. To prevent automated deployment failures, ensure that credentials are specified.
- Public images are always generalized (prepared), and always require credentials.
Clicking Add Credentials allows you to create new Guest OS credentials for VMs deployed from this service. The password must be between 8 and 123 characters and must contain three of the following: a lowercase character, an uppercase character, a number and a special character. Don't lose this user name and password, or the VM will be inaccessible. If credentials assigned to a service catalog component are deleted, the service is marked as corrupt and can't be requested. |
Attributes tab
You can assign metadata to the service component with custom attributes and groups.
Attributes tab settings apply globally to the deployed component. If you want custom attribute values and groups to vary depending on whether the VM is deployed, you should instead create conditional component-level completion workflows. For example, you may want to assign different power schedule groups for VMs deployed on AWS and VMware. In this case, you'd add two conditional Set Groups steps to the component-level completion workflow: one that acts on components deployed on AWS, and one that acts on components deployed on VMware. For more information on conditional workflows, see Make Workflow Steps Conditional.
Custom AttributesSet custom attributes and their default values for this specific component. On the Form tab, you can allow requesters to set values for custom attributes. If you don't specify a default value, no default is set for the component. If you add an attribute on the Form tab, the default value you set on the Attributes tab is presented to the requester as the default value.
To be able to add a custom attribute for this component on the request form, you must add the custom attribute on the Attributes tab first.
If custom attributes were defined for the source VM template, they are prepopulated here. Click  if you don't want this attribute to apply to this service component.
Custom attributes defined for source VM templates aren't displayed for multi-cloud services.
Click Add Attributes to select from the list of existing custom attributes. In the Add Attributes dialog, Form attributes and custom attributes applicable to the current component type are displayed.
To edit existing custom attributes, click Manage Attributes. On the Custom Attributes page, you can add and edit custom attributes. Click the browser's Back button to return to the Attributes tab.
If you add list-type custom attributes that are interrelated, the attributes are displayed in the order of parent to child to grandchild (if applicable). Your selection of a default value for the parent affects the selectable values for the sublist attribute. For more information, see Create Relationships Between Attributes Used on Forms.
GroupsSet the default groups for this component. To learn about groups, including other methods for assigning groups to new services, see Manage Service Groups.
If this component is a VM or VM template, groups assigned to the source template or VM aren't prepopulated on the Attributes tab.
Click Add Groups to select one or more group types and click OK. On the Attributes tab, select a group from the relevant menu.
To add, edit, or delete groups, click Manage Groups; when finished, click your browser's Back button to return to the Attributes tab.
Puppet tab
If you have integrated a Puppet server with Commander, Puppet environments, classes and groups are displayed on the Puppet tab for service components. Select an environment for the VM component. Once you select an environment, only those classes and groups found in that environment are available for selection.
You can select one or more default classes and groups. Ctrl-click to select multiple classes and groups.
Assign classes to nodes indirectly by assigning groups to nodes, rather than directly assigning classes to nodes. If you use the Configure Puppet workflow step to assign classes and variables to a node, Commander creates a group with the same name as the node and pins the node to the group. A parent group named "vCommander" is also created to contain these groups.
You can also allow users to select classes and/or groups on the Form tab. You can then use variables to return the requested values through a completion workflow. For more information, see Integrate Puppet with Commander.
Chef tab
If you have integrated one or more Chef servers or organizations with Commander, Chef information is displayed on the Chef tab for service components.
If you have added multiple Chef servers or organizations, select a server or organization from the Chef Organization menu. Otherwise, the Chef organization is displayed as a read-only value.
Select an environment from the Chef Environment menu. The roles and recipes for the selected environment are displayed.
Select one or more default roles and recipes from the Available Roles and Recipes pick-list. Ctrl-click to select multiple roles and recipes. Use the arrow buttons between the lists to move your selections into the Current Run-List. Then order the roles and recipes properly.
If you don't select default roles and recipes, no defaults are applied.
You can then use variables to return your selections through a completion workflow. For more information, see Integrate Chef with Commander.
Form tab
On this tab, you customize the form users see when they request this specific component. Adding elements to the Form tab allows requesters to change the default settings you configured on the other tabs.
You must add form elements applicable to each cloud; for example, if you want users to modify storage resources for a service that can be deployed on VMware or AWS, you must add both the Storage and the Storage-AWS form elements. If you want users to modify resource requirements for a service that can be deployed on VMware or AWS, you must add the CPU Count, Memory and Instance Type form elements. When a user requests a multi-cloud service, the component form automatically displays only the elements applicable to the selected destination.
If a user requests changes from the default settings configured in the service catalog, these changes are displayed in approval emails, on the approval landing page, and in the Request Details dialog.
If you leave the Form tab blank for all components added to the service, users won't see a component form when they request a service; they will see only the service-level form page provided by the new service request definition. For more information, see Create New Service Requests.
Form elementsForm Element | Description |
|---|
Header | Adds heading text to the form. |
Text | Adds explanatory text to the form. |
Input Text Field | Allows the requester to enter a value, such as a note or a password. Important: If users will be entering a password on the request form, enable Hide User Input. When this option is enabled: - Asterisks (*) are displayed for this field value in the Request Details dialog, emails and landing pages.
- The password is stored, encrypted, in the Commander database.
- The plain-text password can be accessed through the approval workflow variable
#{request.services[x].components[x].settings.inputField['field name']}. For example, if you set the Display Label for the Input Text Field to "Password", you would access the password in an approval workflow script with the variable #{request.services[1].components[1].settings.inputField['Password']}. - If a request containing a password is copied, the password is blanked out.
|
Dynamic List | Allows the requester to select options from lists that are updated in real time from an external source. If the lists can depend on other form elements, the selection of one form element can dictate the available choices for another list. For more information, see Add Dynamic Lists to Forms. |
File Upload | Allows the requester to upload files during the service request process. Uploaded files are added to the VM's local directory as configured in the completion workflow using the Copy Uploaded File workflow step. This allows for more flexibility when scripting unattended installations and additional VM configuration. The file upload functionality can be used with Chef or Puppet for enhanced VM deployment and orchestration. For more information about integrating with Chef or Puppet, see Integrate Chef with Commander or Integrate Puppet with Commander. |
Component Name
(Templates and VMs only) | Allows the requester to specify the deployed component name. The Maximum Length field allows you to change the maximum number of characters (default: 50). See also Customize Naming Conventions. |
CPU Count
(VMware and SCVMM templates and VMs only) | Allows the requester to specify CPU count requirements for a private-cloud VM component. You can limit the number of CPUs that users can request by entering a comma-separated list of values (for example, 1,2,4). |
Memory
(VMware and SCVMM templates and VMs only) | Allows the requester to specify memory requirements for a private-cloud VM component. You can limit the amount of memory that users can request. |
Storage
(VMware and SCVMM templates and VMs only) | Allows the requester to specify storage requirements for a private-cloud VM or virtual service component. The selectable storage tier labels can be customized. You must ensure that datastores are available to back all storage tiers in use. Limit Selections: The Storage form element works together with the Destination form element on the Service form (see Service Request Form Elements). The Limit Selections option controls the interaction of these two elements. For example, let's say you have two destinations — the datastores on the first are assigned to storage tier 1, and the datastores on the second are all assigned to storage tier 2. Your request form contains both the Destination and Storage elements. - If you disable Limit Selections, the selected storage tier controls what destination is used. When a requester picks Storage Tier 1 from the Storage element, Destination 1 is auto-selected. When a requester picks Storage Tier 2, the destination changes to Destination 2.
- If you enable Limit Selections, the destination drives the available tiers. When a requester picks Destination 1, only Storage Tier 1 can be selected for the Storage element. When a requester picks Destination 2, only Storage Tier 2 can be selected. Commander chooses the correct destination in this case.
Virtual services: We recommend enabling Display Storage Tier on virtual service component forms, so that the requester can choose a storage tier for each virtual service component. (The same storage tier will be used for all VMs in a virtual service.) Requesters won't be able to add extra disks. If Storage Tier isn't included on the service request form, virtual service automated deployment will choose the cheapest available configured storage that can satisfy the request. Allowed Actions: Specify whether the requester can Add disks, Change disks, and Remove disks. If you specify that the user can change existing disks, specify the Maximum Disk Size. If you specify that the user can both add and change disks, specify the Maximum Disk Size and Maximum Extra Disks. |
Storage - Azure | Allows the requester to specify storage requirements for a VM component. The Storage - Azure form element works together with the Destination form element on the Service form (see Service Request Form Elements). If you add the Destination element to the Service form and enable the Limit Selections option, the storage tiers and network zones configured for the selected deployment destination are shown on the form, rather than those you configured for the Storage-AWS element and the Network element. The Limit Selections option ensures that users don't select a storage tier or network zone that's unavailable on the target destination. Storage Types: Select Managed and/or Unmanaged as required. Due to an Azure limitation, it's only possible to change this value if you're configuring the form for a custom image with unmanaged storage. Selectable Disk Types: If you selected Managed in the Storage Types list, you can select one or both of the following disk types: - SSD: Premium disks (SSD) are backed by solid-state drives and offer consistent, low-latency performance. They provide the best balance between price and performance, and are ideal for I/O-intensive applications and production workloads. Premium disks are not supported for all instance types.
- HDD: Standard disks (HDD) are backed by magnetic drives and are preferable for applications where data is accessed infrequently.
Display Storage Tier: If you selected Unmanaged in the Storage Types list, you can specify whether the user can select a storage tier. Selectable Tiers: If you selected Unmanaged in the Storage Types list, and you enabled Display Storage Tier, select storage tiers to make them available on the form. Allowed Actions: Specify whether the requester can Add disks, Change disks and Remove disks. If you specify that the user can add disks, specify the Maximum Disk Size and Maximum Extra Disks. If you specify that the user can change disks, specify the Maximum Disk Size. |
Storage - AWS | Allows the requester to specify storage requirements for a VM component. The Storage-AWS form element works together with the Destination form element on the Service form (see Service Request Form Elements). If you add the Destination element to the Service form and enable the Limit Selections option, the storage tiers and network zones configured for the selected deployment destination are shown on the form, rather than those you configured for the Storage-AWS element and the Network element. The Limit Selections option ensures that users don't select a storage tier or network zone that's unavailable on the target destination. Selectable Disk Types: - General Purpose (SSD) - Recommended for system boot volumes, virtual desktops, small- to medium-sized databases and development/test environments.
- Provisioned IOPS (SSD) - Recommended for critical business applications that require sustained performance above 3000 IOPS (number of I/O operations per second), and for large database workloads. Best for EBS optimized instances. Consistently performs at the IOPS level you specify. When requesters select this option, they must specify a value for IOPS.
- Magnetic - Recommended for cold workloads where data is infrequently accessed and scenarios where the lowest storage cost is important.
- Throughput Optimized (HDD): Low-cost Hard Disk Drive volume designed for frequently accessed, throughput-intensive workloads. Best for streaming workloads requiring consistent, fast throughput at a low price, such as big data, data warehouses, and log processing. The minimum disk size for this type is 500 GB. Can't be a boot volume.
- Cold (HDD): Lowest-cost Hard Disk Drive volume designed for less frequently accessed workloads. Best for throughput-oriented storage for large amounts of data that's infrequently accessed. The minimum disk size for this type is 500 GB. Can't be a boot volume.
Allowed Actions: Specify whether the requester can Add disks, Change disks, and Remove disks. If the user can add disks:
- Specify the Maximum Disk Size and Maximum Extra Disks.
- Specify whether new disks will be encrypted by default with the Encryption option.
- Specify whether new disks will be deleted on termination by default with the Delete on Termination option.
If the user can change disks:
- Specify the Maximum Disk Size.
- Specify whether new disks will be encrypted by default with the Encryption option.
- Specify whether new disks will be deleted on termination by default with the Delete on Termination option.
|
Instance Type - Azure | Allows the requester to specify the instance type for the VM. Select the instance types that users requesting this service will be able to choose. Only instance types compatible with the source image's instance type are available for selection. If multiple images are added to the multi-cloud template, only instance types that are common to all regions are available for selection. If you have configured automated deployment, the instance types you select must be available in the target region. |
Instance Type - AWS | Allows the requester to specify the instance type for the VM. Select the instance types that users requesting this service will be able to choose. Only instance types compatible with the source AMI's instance type are available for selection. If existing disks are encrypted, only instance types with encryption support are available for selection. If multiple AMIs are added to the multi-cloud template, only instance types that are common to all regions are available for selection. If you have configured automated deployment, the instance types you select must be available in the target region. If the selected instance type supports it, this form element allows the requester to configure the instance type as EBS Optimized. |
Network
(VMware and SCVMM templates and VMs only; not shown for fenced services) | Allows the requester to change or add network adapters for a VM component by choosing a network zone. The initial number of network adapters shown on the form matches the number of NICs on the source template. When this element is on the form:
- Automatically deployed VMs can only be assigned to networks in the listed network zones, so you must assign network zones.
- If multiple destinations are available to a user, with different networks configured for each destination, you must also add the Destination form element to the Service form (see Service Request Form Elements). If a requester wants to select a network zone that's not available on the default destination, they need to be able to select another destination.
Selectable Zones: Choose one or more network zones that users may select. Allowed Actions: Select the actions that requesters can perform with respect to network selection: - Add adapter: Network zones are not shown on the form if you select this option; adapters are labeled Adapter 1, Adapter 2, and so on, and Commander assigns the network of the first NIC of the deployed VM to all added adapters.
- Change network zone
- Add adapter and change network zone
|
Key Pair
(AWS AMIs only) | Allows the requester to assign a key pair to the instance. A key pair can be used to open an SSH session to a Linux or Solaris instance from Commander and the Service Portal. See Enable Key Pair SSH Connections to Amazon EC2 VMs to learn how to set this up. You can choose one of the following key pair assignments for the instance: - an existing key pair from the region
- Let System Decide: With this option, Commander automatically chooses the key pair to assign to the VM. It will choose one of the following, in the order of precedence listed below:
- a key pair that matches a key pair credential associated with the requester
- a key pair that matches a key pair credential associated with the requester's organization
- a key pair assigned to the deployment destination
|
Credentials
(Azure generalized images only) | Allows the requester to specify credentials for a Generalized Azure image. Generalized templates contain no built-in authentication information, as opposed to Specialized templates, which have preconfigured credentials. Because Commander is unable to determined whether a template is Generalized or Specialized, this form element is available for both types of template. - The use of Generalized templates is highly recommended by Microsoft.
- If credentials are not supplied for a Generalized template, either on the Resources tab or through this form element, credentials must be specified during manual deployment. To prevent automated deployment failures, ensure that credentials are specified.
- Public images are always generalized (prepared), and always require credentials.
The password must be between 8 and 123 characters and must contain three of the following: a lowercase character, an uppercase character, a number and a special character. Requesters can override the credentials you specify. If credentials assigned to a service catalog component are deleted, the service is marked as corrupt and can't be requested. |
Attributes | Allows the requester to specify custom attribute values for a component. If you added custom attributes on the Attributes tab, or if custom attributes were assigned to the source template or VM, these attributes appear under Attributes. Click a custom attribute to add it to the form. If the attribute is a list-type attribute and configured to apply only to forms, you can enable Select Multiple to allow users to select multiple values for this attribute. For more information, see Form custom attributes. If you add a custom attribute to the Form tab and add the same attribute to the service form (see Create New Service Requests), the value specified on the service form takes precedence. |
Puppet Classes
(Templates and VMs only) | Allows the requester to specify Puppet classes for a VM component. This form element appears only if a Puppet server is integrated with Commander. If a Puppet environment was selected on the Puppet tab, only classes found in the specified environment can be selected on the form. See Integrate Puppet with Commander for details. Assign classes to nodes indirectly by assigning groups to nodes, rather than directly assigning classes to nodes. If you use the Configure Puppet workflow step to assign classes and variables to a node, Commander creates a group with the same name as the node and pins the node to the group. A parent group named "Commander" is also created to contain these groups. |
Puppet Groups
(Templates and VMs only) | Allows the requester to specify Puppet groups for a VM component. This form element appears only if a Puppet server is integrated with Commander. If a Puppet environment was selected on the Puppet tab, only groups found in the specified environment can be selected on the form. See Integrate Puppet with Commander for details. |
Chef Run-List
(Templates and VMs only) | Allows the requester to configure a Chef run-list for a VM component. This form element appears only if a Chef server is integrated with Commander. See Optional: Allow users to set a Chef run-list on the request form for details. The Chef Run-List form element can't co-exist with either the Chef Recipes or the Chef Roles form element. |
Chef Recipes
(Templates and VMs only) | Allows the requester to specify Chef recipes for a VM component. This form element appears only if a Chef server is integrated with Commander. See Integrate Chef with Commander for details. The Chef Run-List form element can't co-exist with either the Chef Recipes or the Chef Roles form element. |
Chef Roles
(Templates and VMs only) | Allows the requester to specify Chef roles for a VM component. This form element appears only if a Chef server is integrated with Commander. See Integrate Chef with Commander for details. The Chef Run-List form element can't co-exist with either the Chef Recipes or the Chef Roles form element. |
Deployment page
When you've finished setting options for each component in the service, specify deployment options for the entire service.
Global Deployment settingsField | Description |
|---|
Deployment Order/Startup Order or Deployment Order | Some components in a multi-tier service may require other components to be started and running before they can start. If you deploy the service as a virtual service, you specify both the order in which the components are deployed and the order in which the components are started. If you deploy the service as individual components, you specify the order in which the components are deployed. The reverse order is used for shutdown. There is a 120 second delay between startup and shutdown of each component. Within each group, components are sorted in alphabetical order. Components are deployed serially, not in parallel. An administrator can override this deployment order by manually deploying components in a different order. It's also possible for Commander and Service Portal users with permissions to edit the start order for a deployed vApp. |
Completion Workflow | Completion workflows allow you to specify actions to be carried out after deployment. If you have set up one or more service-level completion workflows, you can select one from the drop-down list. You can click Add Workflow to create a new workflow. You can click Edit Workflow to edit the workflow that's currently selected in the drop-down list. When you edit the workflow using this link, you're editing the workflow for all of the components or services it's assigned to. |
VMware Deployment settingsField | Description |
|---|
Deploy Service As | Choose one of the following options: - Virtual Service: The service will be deployed as a vApp; you can manage the service as a whole after the service request has been completed, but Service Portal users will still be able to see and manage individual VMs within the vApp.
- Individual Components: The service will be deployed as individual VMs.
When creating a service that contains a single virtual service component, choose Individual Components. Otherwise, the service will be deployed as a virtual service within a virtual service. |
Deployed Name | If you deploy the service as a virtual service, you can specify a customized name for deployed instances of the service. Select Use default naming format to use the default virtual service naming convention, or specify a customized deployed name. Click Configure global text replacement rules to shorten your service names. See also Set up text replacement rules for service names. |
Start Deployed Components | By default, VMs are powered on during deployment. If you want to deploy VMs in this service in a powered-off state, clear this option. When this option isn't enabled and a customization spec is assigned to a component in the service, if the VM is migrated to a different datastore before its first power on, the customization spec won't run. |
SCVMM Deployment settingsField | Description |
|---|
Highly Available | If you enable this option, all components in the service will be deployed as highly available VMs. An administrator can override this option during manual deployment. If this option is enabled, automated deployment will use a deployment destination that supports high availability. |
Start Deployed Components | By default, VMs are powered on during deployment. If you want to deploy VMs in this service in a powered-off state, clear this option. When this option isn't enabled and a customization spec is assigned to a component in the service, if the VM is migrated to a different datastore before its first power on, the customization spec won't run. |
Placement page
When you assign a placement attribute value to a published service, you're identifying the requirements of that published service to help ensure that services are deployed to the best destination.
- Click Edit Placement Attributes.
- In the Edit Placement Attributes dialog, in the Not Required pane, select an attribute value that's provided by this destination and click Add to move it to the Required pane.
- Click OK to close the Edit Placement Attributes dialog.
- The placement attribute values you've assigned to this service are displayed on the Placement page.
- For a placement attribute with selectable values, use the Up and Down arrow buttons to order the attribute values by preference. For example, if a service can be deployed on either private or public cloud, but private cloud is preferable, make sure the Private Cloud attribute value is first in the list.
For more information, see Configure Placement Attributes.
Visibility page
Specify which users and groups can request this service.
Field | Description |
|---|
Do not publish | The service is in the catalog but is not available for selection (temporarily disabled). See also Permanently remove services from the Service Catalog. |
Publish - Global | The service is available to all organizations, users and groups. |
Publish - Specific organizations, users and groups | The service is available to the specified organizations, users and groups. Under Organizations, select an organization from the drop-down menu and click Add. Under Users/Groups, enter the user/group name or email address for one or more users or groups and click Add. You can assign a service to both organizations and users/groups. When an organization member requests this service, the deployed service will automatically be assigned to the organization, with the requester as primary owner. |
Summary page
Review the details and click Finish.
The service that you added or changed is displayed in the Service Catalog List View or Table View.
What's next
To edit the service at any time, select it in the list and click Edit. You can use the Service Type column of the service catalog Table View to distinguish multi-cloud services from single-cloud services.
Updating multi-cloud templates
If you edit a multi-cloud template, Commander automatically updates any service catalog entries referencing the multi-cloud template. However, you may need to review blueprint configuration settings. For example, if you add an Azure VM template to a multi-cloud template that already includes VMware and AWS VM templates, Commander will automatically apply default Azure settings to all multi-cloud services referencing the multi-cloud template. But if the Azure VM template requires credentials, and you have not configured the request form to prompt for credentials, you need to add credentials to the service catalog blueprints for all catalog entries referencing that multi-cloud template to ensure successful deployment.
Troubleshooting
See also Repair corrupt service catalog entries.
If you see the following error when attempting to add a multi-cloud template to a service that already contains a multi-cloud template:
"The VM template locations in the selected multi-cloud template don't match locations in previously added multi-cloud templates. These new locations won't be used when this service is deployed."
This means that some of the VM templates in the service will never be deployed.
For example, let's say the first multi-cloud template added to the service contains VM templates from AWS US-East-1 and a VMware datacenter named Engineering. If you add a second multi-cloud template that contains VM templates from AWS US-East-1 and a VMware datacenter named Automation, the multi-cloud service will never be deployed to VMware, because the VMware locations don't match.